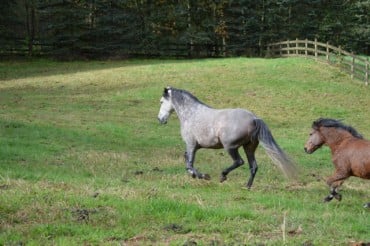
Let’s start with these pictures of my first set-up, where I self-boarded my horses on a friend’s property, and my adventures in paddock footing began.
Galloping down one of the back fields
There are 4 acres of fields here, and three horses (the land could go to a maximum of 4 horses) so I have enough land for a “sacrifice field”. And that way I can keep them on pasture year-round in this super rainy Pacific Northwest climate. BUT, what am I going to put on their paddock surface to create a paddock footing with adequate drainage?
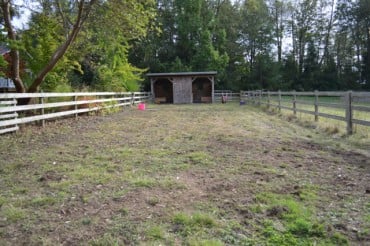
In this front area I call the “paddock” are their water tubs and 2 walk-in shelters, each with it’s own slow feeder and rubber mats. I will leave the back field open for them through the winter until May/June and let them trash it with their hooves and manure. Then I will hire a bunch of teenagers to remove all the manure from this ‘sacrifice field’ thereby removing all bots, eggs, parasites etc. And I will move them to the field next to it. Where I will leave them for the entire summer and winter, let them trash it, etc. By the time the following May/June rolls around, the sacrifice field will be rejuvenated and I’ll flip them again. And repeat, ongoing.
BUT the paddock area in front of the shelters is going to get a lot of traffic, and will quickly turn into a mud pit. So I want to lay down some kind of surface footing that will encourage water drainage and help keep my horses hooves drier, so we can avoid thrush and other hoof problems that are common in this rainy climate. The question is: what should I put down on the surface of this paddock; what drainage materials will work best and not cost me crazy money?
The current paddock footing
If you don’t care about the how’s and the why’s and the research and you just want the solution fast, then here’s what I recommend after not only turning this area into a dry paddock – but also after increasing my herd to 11 horses, moving to another property, and creating a dry paddock there!
Create a Dry Paddock in even the Rainiest Climate
After six winters in the Pacific Northwest rainforest, with 3-11 horses, here’s what I’ve found works best:
1. Ideally, spend some time watching where/how water flows in your paddock area. When you’re scraping the soft soil off (see step 2 below) try to grade the area so water will be encouraged by slope and gravity to flow where you want it to. If you need to install a drain or culvert – here’s my handy step-by-step guide to install a French drain.
2. Clear all soft organic soil, grass, down to the compacted subgrade soil. You can use this scraped-off earth to create a nice hill for them to climb/play on in their pasture, which will also create an area of high ground to stand or lie on during winter. When should you scrape down to subgrade soil? In the summer. Mud creates mud. So if you scrape down during a wet season, the rain will just turn the formerly compacted soil into more mud. So you watch where water flows when it’s raining, and then scrape and lay your gravel during summer when it’s dry.
3. After scraping down to compacted subsoil, put a commercial-grade barrier material on top of the hard pan soil. Use something like this Nilex non-woven geotextile with a load capacity that can withstand rock, gravel and horses hooves. My friend Mitchell Allen, who builds horse trails in public parks uses this exact material. Do not just go buy geo-textile cloth from your local nursery or hardware store (tried that, doesn’t work!). If you live in a place that only occasionally gets wet/floods, then you may be able to skip this step. But if you live somewhere rainy like the Pacific Northwest or UK, then this industrial-grade barrier material is crucial.
4. Now lay a layer of large rock or recycled concrete (3 inches wide or larger rock) on top of the Nilex barrier, about 5 inches deep. It needs to be deep enough that the rock compacts and locks together – so one layer (of 3″ rock) is not enough.
5. Next, on top of the 3″ rock, spread another 5 inch deep layer of 3/4 inch minus gravel (sometimes called Road Base). So make sure your two layers, over your Nilex Geotextile, are at least 10 inches deep. You now need to compact your paddock surface – use a tamping/compacting machine and water the gravel between tamping to make sure it compacts down well.
6. Lastly, if you want to make your manure-picking way easier (more on this below), or have a bit ‘softer’ surface for your horses, then add a 2-inch deep top layer of 1/4 inch minus gravel, on top of the 3/4 inch gravel. Go ahead and compact again.
What does minus mean, when referring to gravel? It simply means that the particle size of the gravel is guaranteed to be less than the measurement. So 3/4 inch minus gravel means that the largest particle size is 3/4 of an inch and all the gravel in the load is guaranteed to be 3/4 inch or smaller.
Note: Some people like to put a layer of crusher dust as their top layer, but I’ve found the fines in crusher really interfere with drainage, as they form this solid packed layer on top of all the gravel. Also, if you want your paddock to give your horses the opportunity to self-trim their hooves… then definitely don’t put crusher dust as your last layer on top. The 1/4″ minus, which will mix in with the 3/4″ gravel over time, gives hooves a great self-trimming tool. With 2400 square feet of gravel, my horses were able to self-trim enough that they only needed the farrier to come out and trim every 5-6 months. I’ve also not had one issue of gravel ‘puncturing’ or injuring their soles – when horses’ hooves have a place to dry out regularly, and they have a variety of surfaces to choose from, in my experience, their hooves and soles harden up and just take care of themselves.
If you are ordering crusher dust, it’s best if you can get a look at it, to make sure it is just rock fines and doesn’t have clay (or a lot of sand particles) in it. Usually it’s okay, but one year (same supplier) the crusher had clay in it and it completely packed down and stopped all drainage from happening! I ended up having to remove that entire layer and use it as fill elsewhere.
Tip: When spreading the top layer of crusher dust or 1/4 inch gravel, I have it spread 6-12 inches away from all the walls or sides of the paddock. This concentrates it where the horses will actually be standing/walking. It will naturally get pushed out to the edges over time anyway. This way, I’m not having to shovel it back in to the center as it builds up along the edges (where it’s wasted).
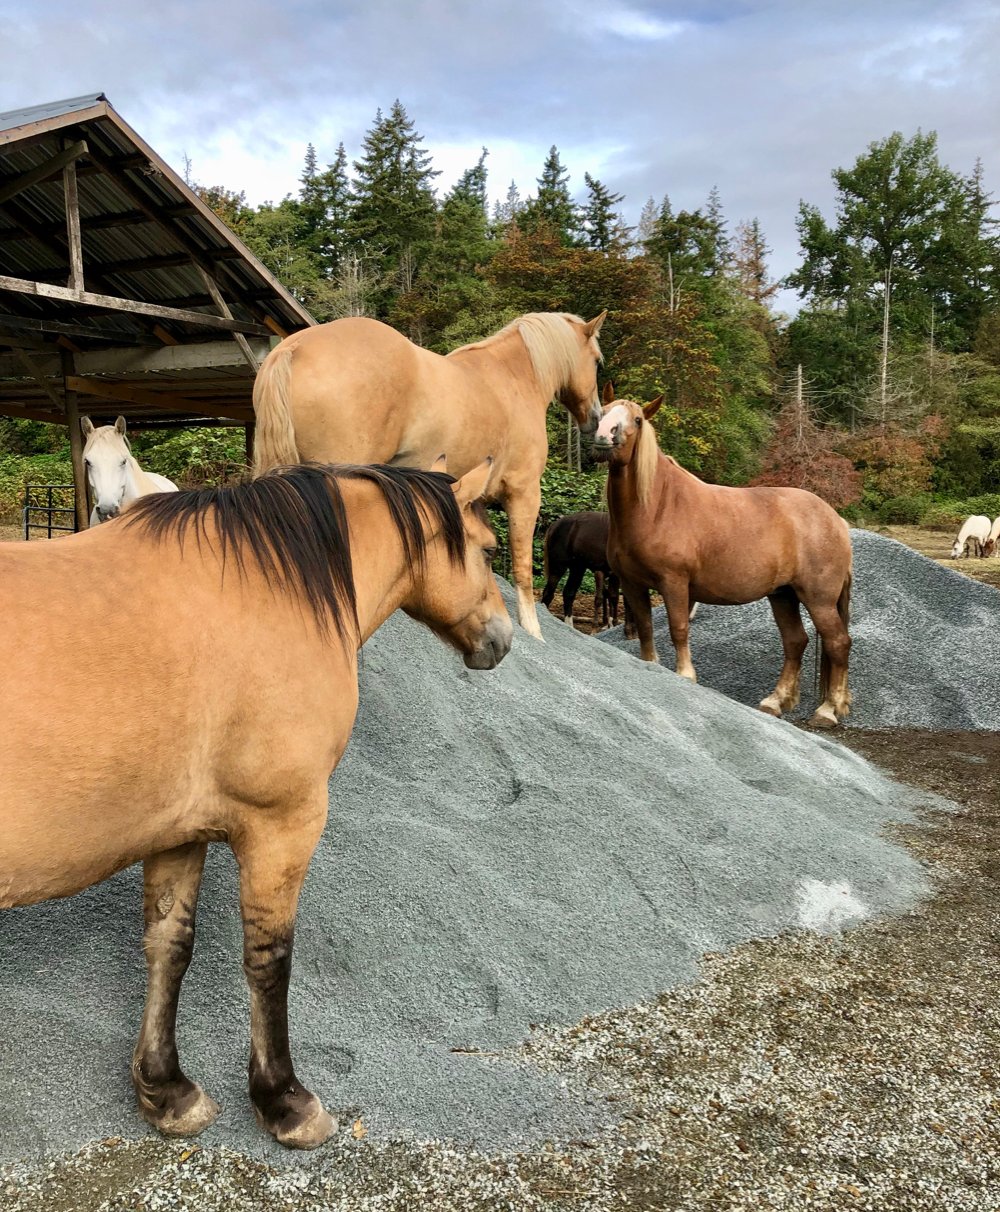
If you have all your rock and gravel delivered and on-site, a guy with an excavator (to scrape down to hard pan) and a Bobcat (to spread the rock and gravel) can get all 6 steps done in a day. I prefer the smaller tractors since they can maneuver better around posts and corners – so there is less hand-finishing work for me to do. Don’t worry about timing everything to occur on the same day. I usually have my gravel delivered 2-3 days before the Bobcat/tractor guy arrives as my horses love playing on the gravel piles!
They love playing on the gravel piles
I also don’t worry about having my horses loose when the machinery is here. Some horses freak out and run around, others are curious and want to look inside the bucket and cab, but either way, once they start working the horses move out of the way.
Okay, now that you know what to do… I’m going to tell you about all the options available and what other people say. I’m also going to tell you about the things I’ve tried that didn’t work so well for me.
Which Paddock Footing Materials are Best?
This is a debate which could go on a long time, so I’m just going to summarize the various positions here and give some examples.
One herd owner I know used a mixture of various sized gravel, sand, and crusher dust. But she said she wouldn’t use the crusher dust again, since it packs down like cement. Crusher dust is gravel that has been crushed to the size of 1/4″ or less. It can also be called quarter minus, or flume sand. However, on the flip side of that argument, here’s what a Farrier has to say about why she prefers crusher dust:
“As a farrier, my favourite footing in this area is crusher dust. My clients have a rubber mat outside and they feed off of that. If the hay does get on it, it isn’t like sand for colic concerns that I’ve ever heard of. It keeps their feet in the best shape of all the footings I’ve dealt with. Be aware that there are different types of “crusher dust” and the type that sets up very firm is what I prefer. The other stuff is too loose and just moves out of the way like pea gravel. It would probably be fine in a drier climate but on the Wet Coast, it isn’t ideal.
Sand tends to overwear the feet but of all the footings for paddocks, it tends to be my second choice because at least their feet stay dry.
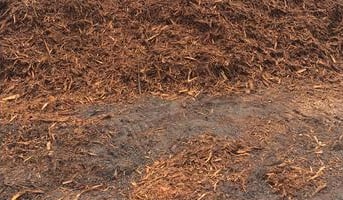
My least favourite footing is hogfuel and I’d probably have them stand in mud over hogfuel because when hogfuel is new, it is very acidic and it etches out the sole of the foot, leaving the foot more vulnerable (I’ve seen hooves so bad on it that a hoofpick can poke through the sole easily. I’ve also had a few that you had to be careful even with thumb pressure because that was enough to poke a hole through the sole.). As the hogfuel ages and the acid leaches out, it turns sloppy and is a fantastic host for bacteria so again, another problem to deal with.”
The most common concern about using crusher dust – which is just tiny, crushed gravel – is whether it will be too sharp for the hooves. But again, after researching, I think that’s an issue of the existing surface, how much is used, and what the resulting footing is like. The same Farrier I quoted above also says:
“It locks together and makes a very firm surface with just enough give to allow for maximum traction. It isn’t something the horses prefer to roll in but give them options on a rainy day and they will stand on it over most other footings. Because it packs down fairly solid, it doesn’t have the big pointy bits that are inclined to puncture and lead to abscesses. That said, you pretty much have to see the different types and as was mentioned by someone else, you have to know how the surface below it will effect it. If you are putting it over mud, you aren’t going to get the positive results that many of us see with it. Sometimes you have to do some research into what to lay down below it.
I’d highly recommend going to look at farms that offer to let you see theirs and take a good hard look at their horses feet. I have seen improvement in hoof quality in every foot taken from hogfuel or mud and placed on crusher dust and comparing it to the sand options, it is still a better hoof. That said, there have been some crusher dusts surfaces that while I feel they are an improvement over hogfuel or mud, are still not “the best”. If you are already starting with fairly hard footing underneath, crusher dust may not be your best option but on the Lower Mainland and Fraser Valley [of BC, Canada], it is rare for it not to be an improvement.”
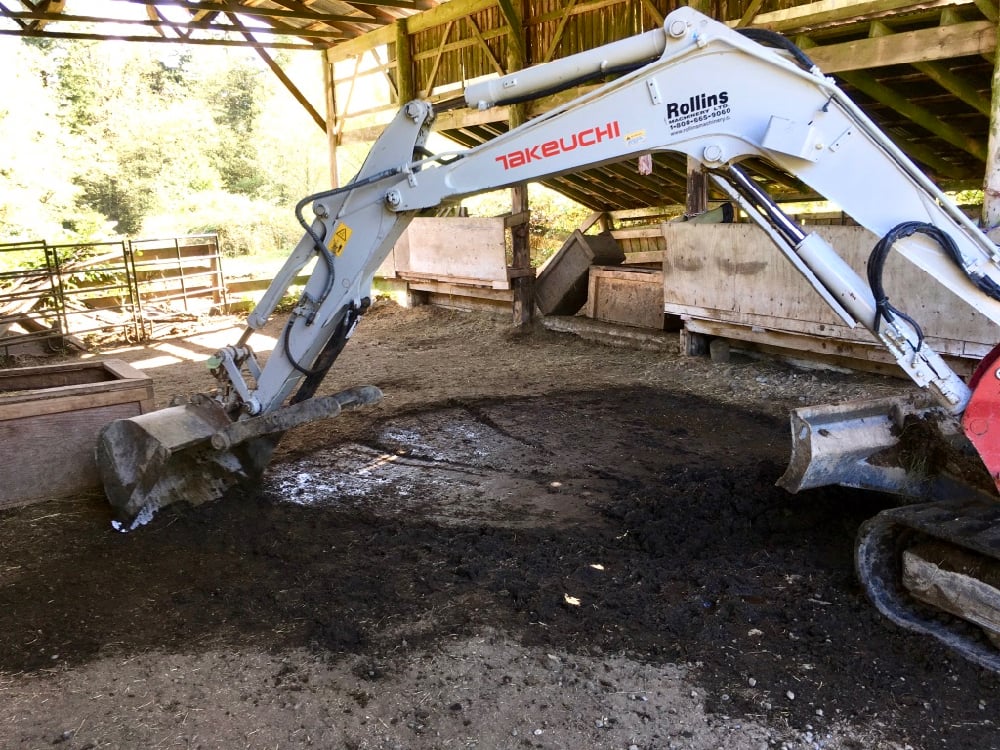
One thing everyone does seem to agree on, is that if you are using crusher dust or gravel, it’s best to scrape off the topsoil (mud) first and get it down to the hard soil surface, then lay your footing.
An excavator removing soft dirt to get down to hard pan before laying the gravel
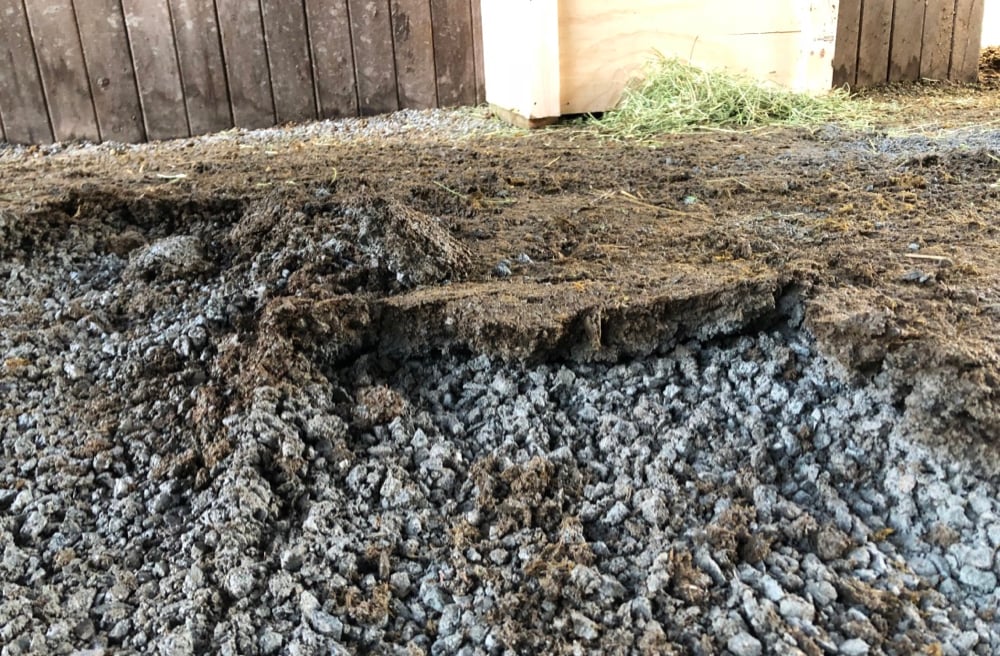
For the people that love crusher dust, they seem to love it because it packs down hard and forms a cement-like surface that doesn’t sink into mud. But as I pointed out above, examine the crusher before you order it, to make sure it is just crushed rock fines and doesn’t contain any clay particles. It is the clay that especially packs down so hard the water will not drain through well and just runs off the surface.
The compacted layer of crusher dust – see the fresh, clean 3/4 inch gravel underneath. This compacted layer had to be chipped off and thrown out.
However, depending on the surface you lay the crusher dust on, it can also mix easily with the mud and be gone by the next rainy season. I know several stables that just dump fresh crusher dust on their paddocks every year to replenish the surface – because they didn’t follow the steps I outlined above, they just dump the crusher right on the earth.
When I called a local nursery that sells everything (pea gravel, crusher dust, limestone, sand, mulch etc.), they told me that the Cloverdale Racetrack uses limestone gravel for their track. They said it packs down better than pea gravel in the rain, there are less of the tiny stones to get stuck in the horse’s hooves, and it’s easy to shovel manure off of. They also recommended I use 6 inches of it.
I do NOT recommend you use pea gravel as the smooth, rounded stones do not lock together. They just slide around, build up in certain areas, and the horses’ hooves slide straight through it and create holes in the surface. You need the regular 1/4″ minus gravel or crusher dust for your top layer so it locks together and doesn’t slide all over the place.
A number of articles I’ve read on this subject suggest using a minimum of 3 inches of footing (surface drainage material), or to use the same depth your mud gets to. So if your paddock usually turns into 5 inches of mud, then use 5 inches of footing.
What if There is No Hard Soil?
The big problem you get in many (most?) parts of the Pacific Northwest and the U.K., is that there is no hard compacted soil, or shale, or rock beneath the topsoil! A friend of mine who builds roads in the Vancouver area – and whose father builds horse arenas – told me that you can go down 6 feet and you still won’t hit any kind of hard soil or anything that would provide a barrier to your gravel sinking away.
He suggests you lay down 5-6 inches of a 3-inch minus rock layer first, to provide that hard layer and then put your gravel on top of that, or you will just have to dump the same amount of gravel every year, year after year, because it just keeps sinking.
However, horses hooves are way more punchy than car or truck tires. So another friend of mine who builds both roads and horse trails in provincial parks, says that you can’t just put the 3-inch rock layer down. You first have to put a commercial-grade shielding material used in road building – like Nilex – down on the soil and then lay down the 3-inch rock or recycled concrete (often cheaper), and then the gravel. My own experience (keep reading) confirms this.
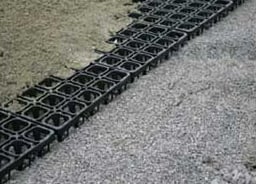
What about Draingrids?
If you live in a climate that only gets occasional rain, or a short rainy season, then you may be able to just lay either a commercial-grade shielding fabric or a specialized plastic draingrid on top of the hard pan soil, then layer 2-4 inches of 3/4 inch minus pea gravel and top that with a 2-inch layer of 1/4 inch minus limestone gravel, or crusher dust.
I haven’t tried draingrids or mudgrids myself, so I can’t comment on them. From what I’ve seen in my research, I wouldn’t want to use them in a super muddy area unless they went on top of geotextile and road base – otherwise, the mud would just ooze up through the grids as the horses walked/ran on them, so you’d be continually cleaning the mud off them, or the mud would be mixing with your crusher fines.
For my super rainy climate (the Pacific Northwest coast) after trying cheaper variations – and having to spend an additional $2,000 on gravel every year, because it just kept sinking – I finally hired my friend Mitchell, who gets the commercial-grade barrier material from Nilex, to come in and do it right for me. Because even if you clear down to hard pan, put a layer of 3″ minus rock, then 4 inches of 3/4-inch minus gravel, and 2 inches of 1/4″ minus or crusher dust… it still sinks! And next year, I had to spend another $2K to spread 3/4-inch minus gravel on top. And I had to do that every year, for 4 years, until I finally got my friend Mitchell to come in and do it right.
Mitchell uses the Nilex 4551 Non-woven Geotextile when he builds horse trails in provincial parks. When he’s building horse trails, he puts down the Nilex geotextile, then 5-6 inches of 3″ rock, then 6 inches of road base (3/4″ minus). Nilex is a worldwide company, but if you can’t get that material, then just show your supplier the spec sheet and get them to match it.
But, I know how stubborn we can be, and how sometimes we just need to find things out for ourselves, so I’m going to keep going with giving you other people’s ideas (that won’t work in a rainforest climate!) just in case you want to waste your money like I did. OR perhaps you live in a region that just gets occasional downpours or flooding, so you don’t think you’ll need the geotextile layer, or the same layers of rock/gravel. Also check out this post by an Oregon farm as it has a lot of good tips for what works and what doesn’t.
Two Layers of Footing/Drainage – Different Sizes
If you don’t have the budget to hire a tractor to remove 6-12 inches of soil, what is a cheaper alternative that might still work, if you’re in an area with only occasional rain or flooding? Dr. Ann Swinker (professor of Equine Sciences) says:
“Ideally a two layer footing system works best when working with gravel. It consists of a coarse aggregate base and a finer cover layer. Neither of these materials work well alone. Coarse aggregate does not compact easily; many voids may result leaving the surface uneven and difficult for livestock to walk on. The finer material compacts easily but will move under heavy traffic. When the two materials are used together, the fine material fills in the voids left by the coarse material. The result is a durable, all-weather surface that is acceptable for animals.”
Now, keep in mind that Dr. Swinker’s advice is not tailored for a heavy rainfall area. So yes, it will work in this climate (I tried it) but it will only work for one winter. The next winter, you will need to add another 4-6 inches of 3/4-inch minus gravel. If you were to follow Dr. Swinker’s advice, you could use pea gravel 0r 3/4-inch minus gravel on the bottom and crusher dust on top (crusher is really just tiny gravel with gravel particle dust), or limestone gravel and crusher dust, or limestone gravel and sand. However, you don’t want to use sand if your horses are going to be eating on the surface (can cause colic if ingested). But if your horses have slow feeders in their walk-in shelters, that is not an issue.
When choosing gravel, pea gravel, or limestone gravel, most experts say you should get crushed rock particles no larger than 3/4-inch, or they are not comfortable for the horses to stand on. However, if you can get them small enough (usually 3/8″ – 5/8″) to filter through the tines of your manure fork, that will make scooping poop much easier and reduce gravel wastage. This may seem like a small point, but trust me, it makes a huge difference to the time spent scooping manure AND the loss of expensive gravel that gets tossed out with the manure.
How Much Drainage Footing to Order?
The one thing you notice when you’re trying to price out gravel or crusher dust, is that pricing tends to be in cubic yards. Luckily there is a super easy way to convert square feet to cubic yards:
1. Multiply the square footage (length x width = square footage) of your paddock by the depth of gravel you want. BUT your depth must also be in feet, not inches. So 6″ = .5 feet, or 3″ = .25 feet.
So now that I have all the information needed to make a good decision about what is the best paddock surface for horses in a wet, rainy climate… it’s time to look at what I’m prepared to spend!
My big constraint with my first horse boarding set-up was that it is not my own land, I didn’t have a long-term lease, and so realistically, I could be kicked out at any time. This seriously impacts my decision-making process. So instead of implementing what I know would be a great solution, instead, I’m trying to figure out the most cost-effective way of making sure my horses don’t get thrush and can maintain healthy hooves through this year’s wet, rainy Winter and Spring. I’m less concerned with the following years, since I may not even be there.
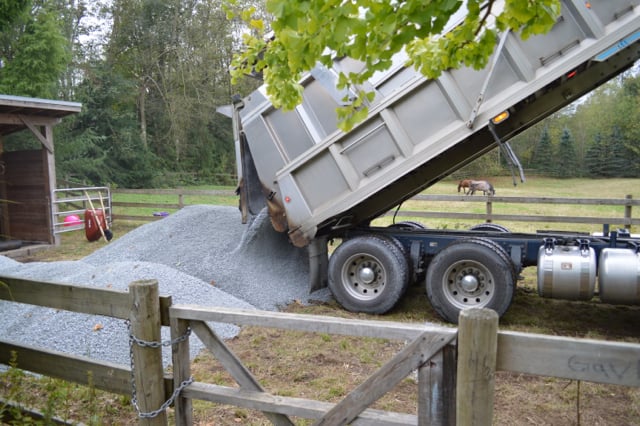
Since I have not prepped the paddock surface and the gravel will be dumped straight on the grass, I decide to order 39 tons of 3/4 inch minus gravel from Fraser Valley Aggregates. I’m concerned that if I use crusher dust or a smaller gravel, it will be easily churned into mud before the winter’s over. Here’s what 3/4 inch minus looks like and it costs me $700 including delivery:
The truck arrived and dumped both loads of gravel near the shelters.
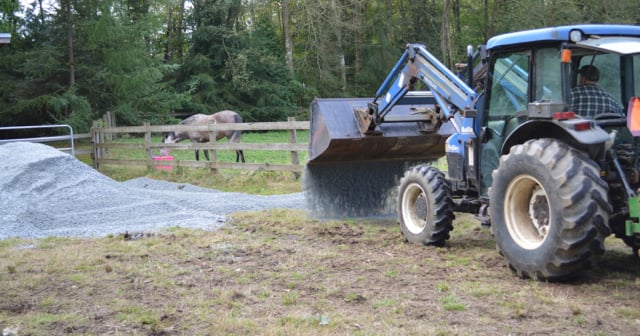
I thought I could get a few friends out and spread the gravel using rakes, but when I looked at the size of the piles and realized how heavy the gravel was, I decided to hire a local farmer to come spread it for me.
NOTICE I ended up calling a guy with a tractor anyway! If I had known I would need him, I would have had him spend 30-60 minutes removing that topsoil/grass layer first, before spreading the gravel. Wouldn’t have cost much extra, but would have greatly extended the life of the gravel I ordered. Live and learn!
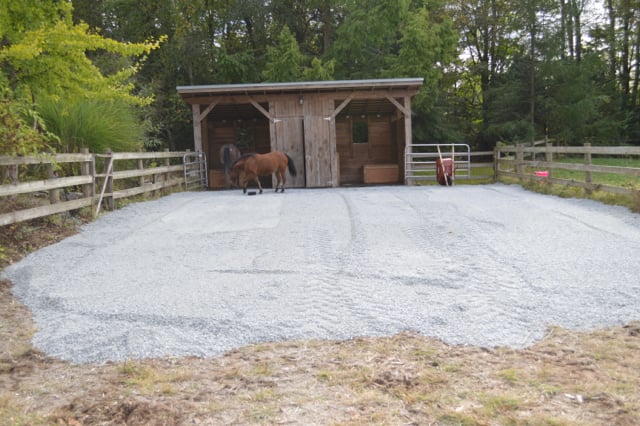
Here’s what it looked like after the two truckloads of 3/4 inch gravel was spread out:
I was happy with this for a few days, and then I started fretting about the fact that there really wasn’t much room for them to move around and exercise, yet stay on the gravel. Then I thought: What if they get a thrush infection and I need to keep them completely off mud… I won’t be able to do that without cross-fencing the paddock! At that time, I also hadn’t bought/used any arena panels – which are super useful for cross-fencing or creating smaller paddocks.
The farmer who spread the gravel for me suggested I try a load of crusher dust from Upper Fraser Valley Trucking next time – he thought it would be a better surface, even spread directly on grass. So I called them up and ordered 45 tons of 1/4 inch minus crusher dust with squared edges (not sharp) and had that spread on the remaining half of the paddock. That cost me $840 including delivery.
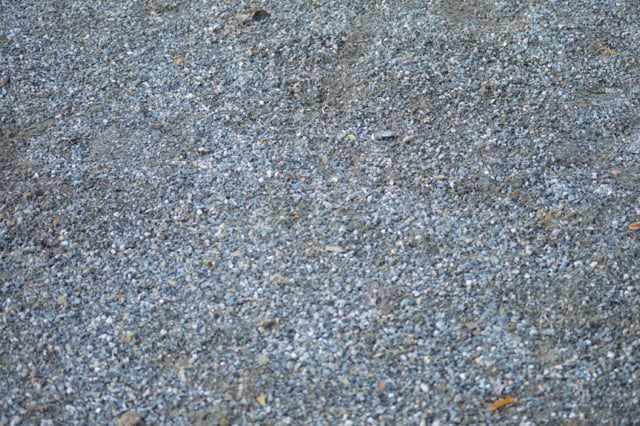
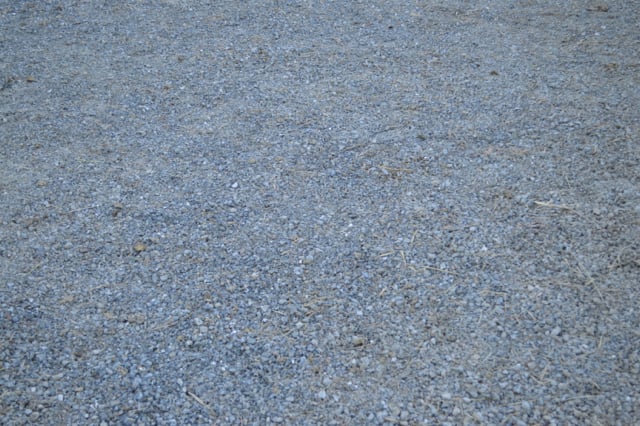
Here’s what the 1/4 inch minus crusher dust looks like on the paddock:
1/4 inch minus Crusher Dust
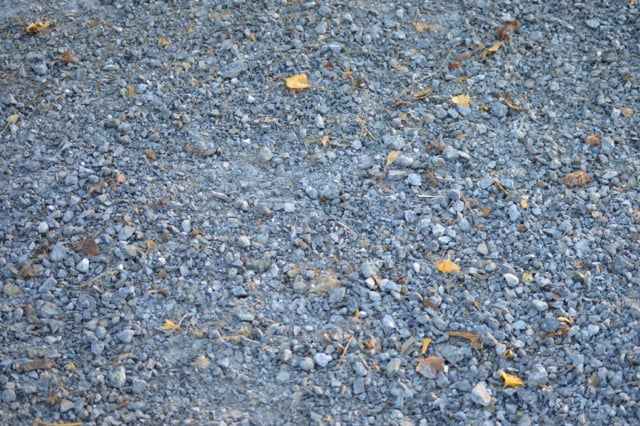
And here’s what the 3/4 inch gravel looks like on the paddock:
3/4 inch minus Gravel
I figured this would be a really good test to see which gravel held up best under the horse’s hooves during the rainy season, because I had them side-by-side for direct comparison! Note: hiring the tractor cost me $400.
Here’s all the things I did not anticipate, so you can benefit from my learning curve:
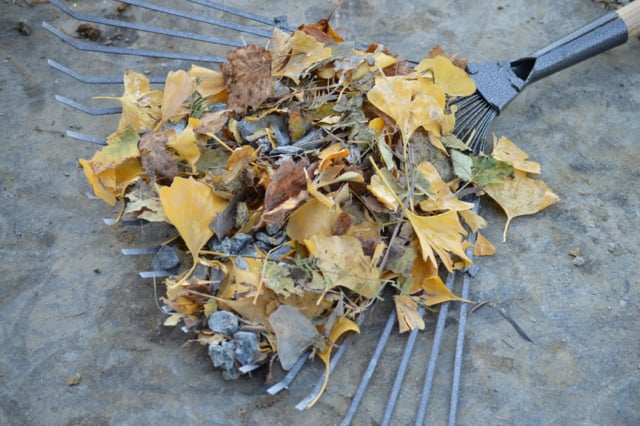
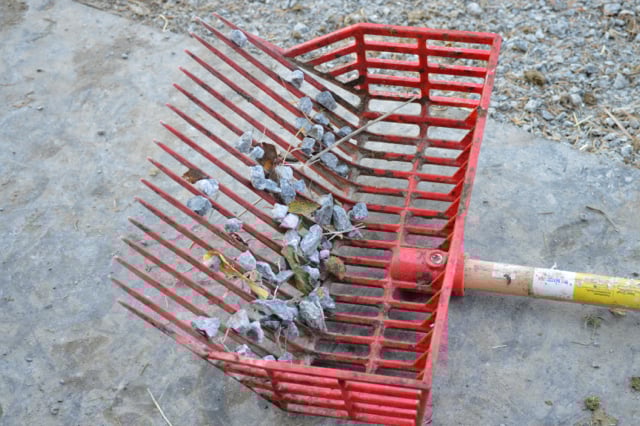
1. As you can see from the 2 photos directly above, it is much easier to rake all the leaves off of the crusher dust. With the gravel, the rocks are often larger than the leaves, so the rake ends up gathering the rocks and the leaves are left behind. The larger chunks of rock are also easily caught in the rake, so you end up dumping a lot of the gravel you just paid money for, out with the leaves – which does not feel good! Remember that you need to remove all organic matter from the surface of your gravel to ensure it is kept clean and can drain properly. If you let any organic matter build up, it will break down into soil/mush which will defeat the whole purpose, as your horses will now be standing on a wet surface.
3/4 inch minus gravel stuck in rake
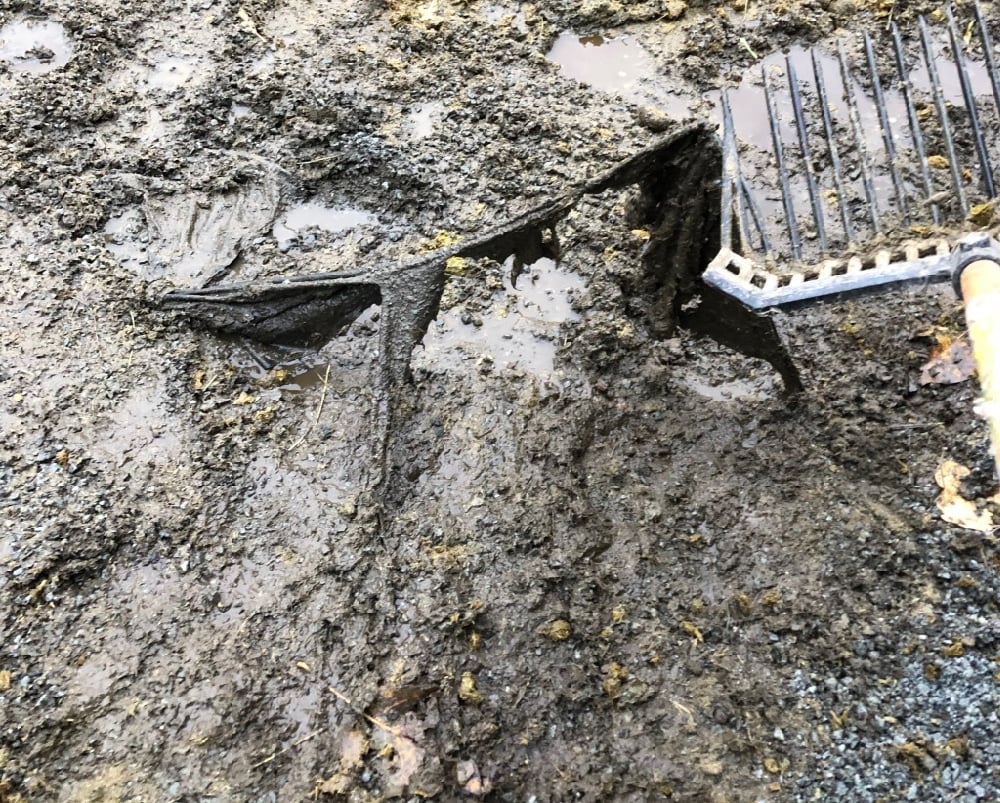
2. The same problem occurs when you shovel manure. The 3/4 inch gravel gets stuck in your manure fork and you end up throwing away a little bit of your money every day when you clean the paddock:
3/4 inch minus gravel stuck in manure fork
3. The whole idea of having a gravel or crusher dust top layer is to prevent wet organic matter (soil, grass, hay, leaves, manure etc.) from coming into contact with your horses hooves, and then to facilitate the drainage of rainwater away from the surface, so your horse’s hooves stay drier. So you cannot leave any of this organic matter sitting on your gravel, or else it will quickly break down into a mucky layer that defeats the whole purpose. Manure and leaves also break down quickly in the rain, so you must clear them off your gravel daily. This is really labor intensive – and I totally did not anticipate the amount of leaf raking I was going to have to do!
The Winner: Gravel or Crusher Dust?
In hindsight, even if I could not afford to remove the topsoil and lay down the proper layers first, I should have dumped 3/4 inch minus gravel directly on the grass (at least 3 inches) and then dumped 1/4 inch minus crusher dust directly on top of the gravel (at least 2 inches deep). Remember, I was only looking for this paddock to last a year or two. Here’s all the reasons why I should have done it that way…
In the middle of the worst rains of winter, the 3/4 inch gravel has the best drainage and keeps the surface drier, even during a full day of rain:
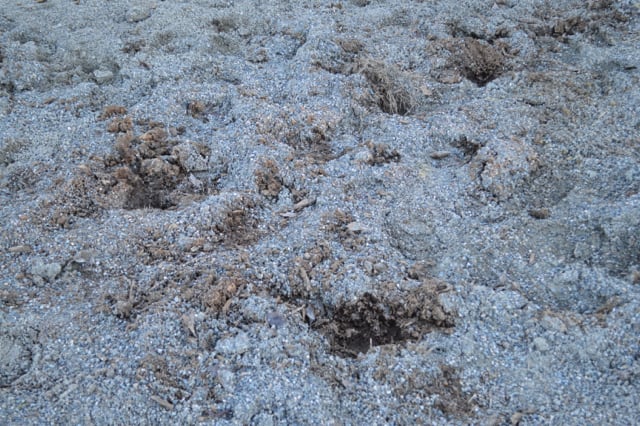
On the same day, here’s what patches of the 1/4 inch crusher dust look like – you can see how the mud and soil underneath has been churned into the crusher dust. On a full rainy day, these patches fill with standing water – there is no drainage:
So why not just use the 3/4 inch gravel? Well, because of the difficulties cleaning the manure and leaves off it (detailed above) AND the horses will not lie down on the gravel, but they will lie down on the crusher dust. Good sleep is an important part of a happy, healthy horse. However, later experience taught me that depending on the type of crusher dust, and how hard the ground is when properly prepared, the horses won’t lie down on it anyway – so this is an unknown factor.
Another consideration: If you live in a dry climate with little rain, the dust particles in the crusher dust can work themselves deep into your horse’s mane and coat. Not only does this make them very hard to brush clean, but the particles are super fine dust that occasionally irritate the horse’s eyes and are certainly not healthy for you or your horse to be inhaling. Rain on your crusher dust quickly takes care of this problem though.
You can also examine the crusher dust and see which supplier’s contains the least amount of dust. However, you can’t just use 1/4 inch minus with smooth edges, or 3/8 inch minus smooth gravel with no dust – as then the gravel will not pack down well. You need the jagged edges and different particle sizes for the footing to pack down well and not just slide around every time a hoof punches down on it. I tried that one year and it was the worst gravel ever – because it slides around so much it also mixes with all the manure particles and you can’t ever get the manure off the smooth gravel.
How Did The Paddock Hold Up Over The Year?
Well, I laid the paddock footing in August. By February, all the horses hooves were still in great condition (they are also fed low sugar hay, which makes a huge difference to hoof health) and the surface was still in good shape.
But by April, the area around the slow feeders was wet and mucky. Even though we moved some gravel over from other parts of the paddock, the gravel had sunk down into the soil all over, so there wasn’t much left to scavenge.
By May, the area around the slow feeders is mostly dirt
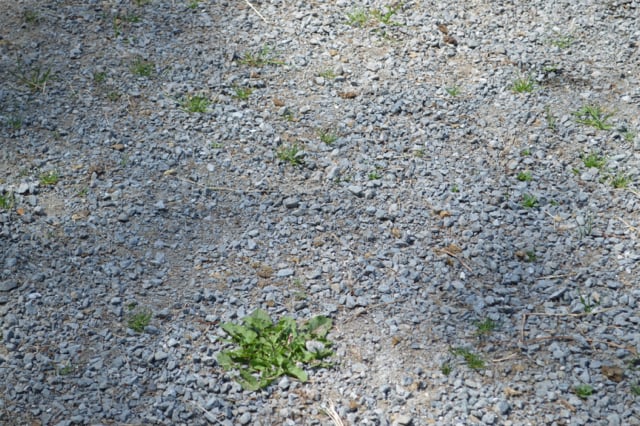
By May, you can see that the paddock surface is pretty much toast – the grass is growing up from underneath and the gravel has almost disappeared from sinking into the soil – and the entire thing will have to be re-done again in August for approximately the same cost ($2000 total including tractor to spread it).
The three-quarter inch gravel by May (9 months later)What the crusher dust looks like in May (9 months later)
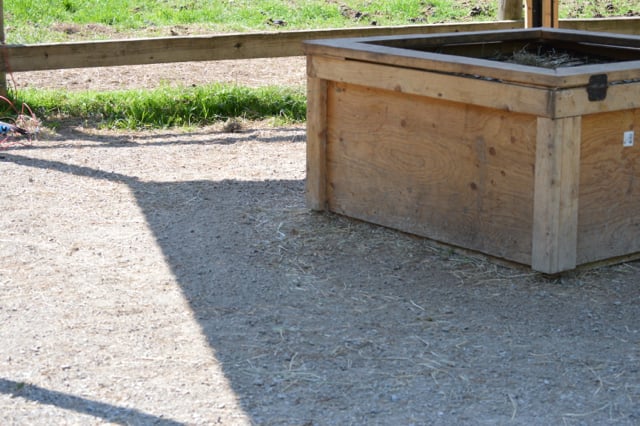
Oh, and even though I added a new portable shelter for them, so they could stand outside to eat, this rain cover did not prevent the gravel from sinking into the ground around the slow feeders by April; just from the wear and tear of their hooves – without any rainfall on it.
A new shelter with slow feeders under it – horses are standing on gravel while eating, but can still feel the sun and freedom
In my opinion, in this rainy climate, not removing the topsoil down to the firmer layer and then putting down a layer of commercial-grade barrier, and then a layer of large rocks (at least 3 inches wide) is throwing your money away. The gravel and/or crusher dust only lasts one season and so you have to pay out the same amount every year. If you do it right the first time, you may only have to do the underlayers once (as long as you keep organic matter off your paddock surface) and then top up with crusher dust every couple of years.
However, at my current property, after doing everything exactly right, with the commercial-grade barrier cloth and all the right layers, by the end of the winter there were still craters and low spots in the footing. It seems there is nothing harder for wear-and-tear on gravel than horses’ hooves! Of course, I also have 11 horses and they are young and feisty. So they tear around a lot, wrestle, lunge and pivot etc. If you had a docile herd of 2-3 horses you would likely be just fine. But as mine are so hard on footing, and there’s so many of them lunging around, I have to level and add more crusher every year or two.
What About Geo-Textile Cloth?
Just before we close, let’s talk a bit more about geotextile cloth, which many paddock experts recommend using. In 2018, I did an experiment with laying standard hardware store geotextile cloth down on the compacted subgrade soil, in a new section of my horses paddock area. Then I added 4 inches of 3/4 inch minus gravel, and then 2 inches of crusher dust.
I was interested to see if it would work, as a woman had written in (who also lives in this Pacific Northwest climate) to tell me that it’s never worked for her horses. And unfortunately, I have to report that my experience has been similar. I think the punchiness of horses hooves disturbs the gravel so much, that all that needs to happen is for them to punch through to the geotextile in a very small spot and then that quickly enlarges. And then the cloth gets moved around by their hooves.
I tried it in two places – under a shelter with 4 inches of gravel (3/4 inch minus) and then 2 inches of crusher dust. And in a paddock entryway with 8 inches total of gravel/crusher. Both areas were destroyed in a couple of months once the rains started – the cloth was either sticking up all over the place (the other woman said her horses would then grab it in their teeth and pull on it – we just cut it off), or it had disappeared into the muck.
What’s left of the geotextile cloth 3 months later
I will say, that year was the worst for rain we’ve had in a decade or so – tons of houses had their basements flooded for the first time ever. So the amount of rainfall was certainly unusual. Regardless, I don’t think it’s a good option and I would never use it again.
When I showed it to my friend Mitchell, he said the two problems with what I did were (a) I did not use industrial-grade geotextile, and (b) I did not put enough rock and gravel on top of the cloth. Remember, he uses 5-6 inches of 3″ rock on top of the Nilex geotextile, then 5-6 inches of 3/4″ minus gravel on top of that. He also uses a roller/compactor to really compress and lock the rock together into a nice firm surface that is not disturbed by punchy horse hooves.
During my research, I also called BC Parks & Rec – who commission the horse trails in the provincial parks here and asked them what they did, as their trails seem to stay in pretty good shape all winter long, with lots of traffic on them. They told me a similar story to what I outlined above: After scraping down to the compacted subgrade soil, they place an industrial-grade barrier material, then a layer of large, flat 3-4″ rock. Then they add 3/4 inch gravel, and then crusher dust. Et voila!
I also found it really helpful to install a French Drain in my current paddock to help funnel the water off/away from the paddock – and this made a huge difference in the effectiveness of my paddock surface.
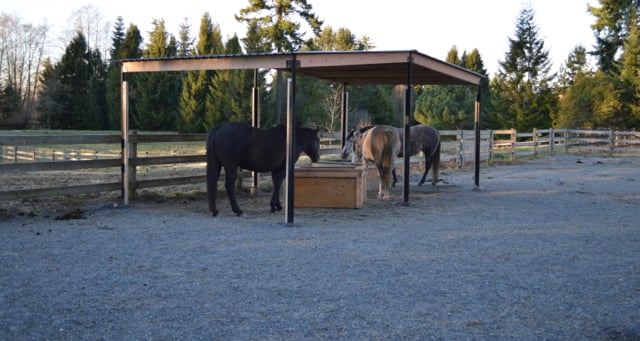
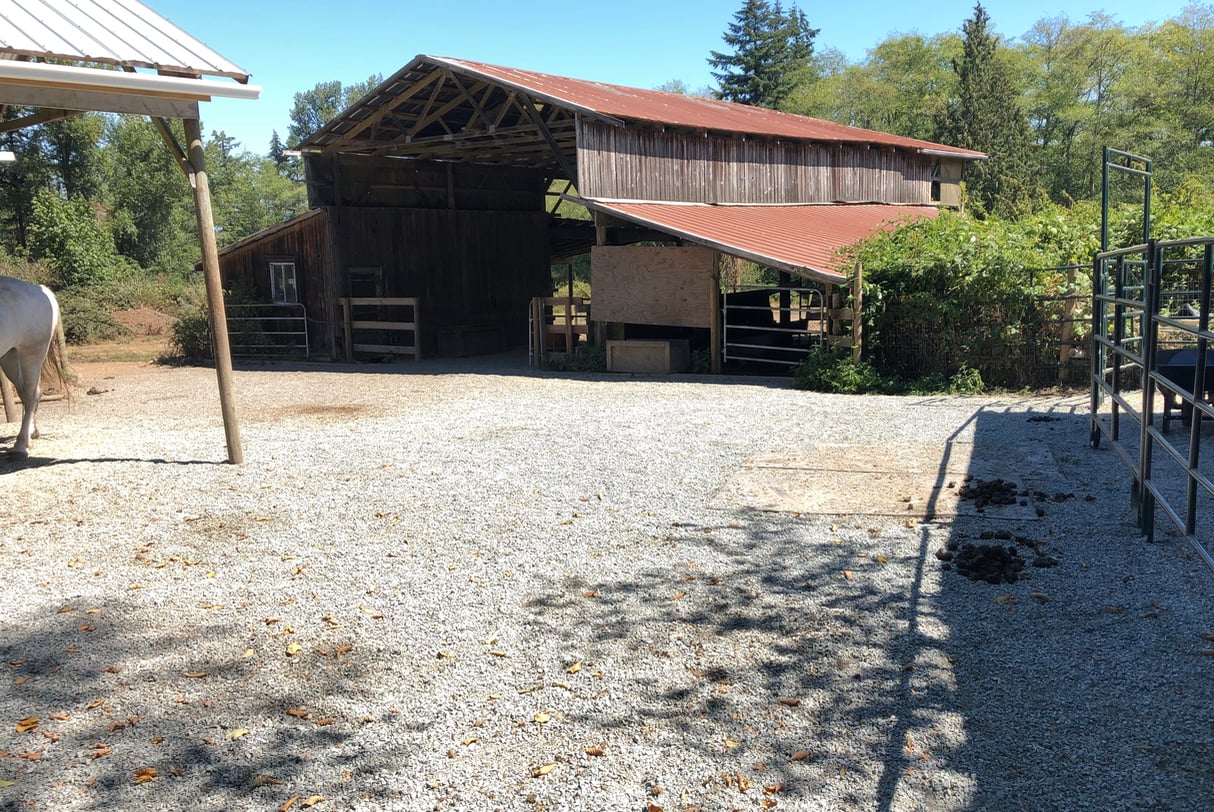
My horses’ current paddock & shelter area
Please feel free to share your experience and experiments in the Comments section below…
Which Paddock Surface is Best for a Rainy Climate?
Jini Patel Thompson is a natural health writer and Lazer Tapping instructor. She began riding at age 2 in Kenya, and got her first horse at age 8 in Alberta, and so continues a life-long journey and love affair with these amazing creatures.
That was a very interesting read! I’m curious to know if you ended up redoing the paddock surface area this year again? And what you used.
I redid an arena 4 years ago and after MUCH research we went the 3″ minus with an “arena mix” of sand and fine gravel on top. (from Kelmor in Chilliwack) We did not do a geo textile cloth (although I had one in my first hog fuel arena). My arena is also used as the dry area on wet days and overnight hours, I am very happy with my surface.
One thing that I did and would highly recommend is after having the 3″ minus delivered we rented a 1000 lb plate compactor and compacted the arena surface for a full week, many, many, many times. The sand was dumped and spread about 2 weeks later. This was an important step because without it the large 3″ minus rocks will slowly start to surface to the top and will need to be “picked” before riding / turnout. I have friends who have used almost the same formula but without the compacting and have to pick the rocks regularly (at least weekly, if not more often).
It has great drainage, and my one complaint is that it gets dusty in the summer, but I consider that a small price to pay for a dry arena in the winter.
I have also not had to top it up in any way, although I pick manure daily, and also harrow it weekly as I don’t want to mess up my base by having “holes” in my sand from the horses playing out there!
I live in Chilliwack, so have the same weather as you 🙂
Great info Donna – thanks so much for sharing your knowledge! I have since left that boarding place, but the owners (who bought their own horses after being inspired by mine) did indeed dump 4 more boxes of crusher dust on that paddock ($1400). It’s holding up well though and perhaps they will only need to re-do it every 3-5 years now; since there’s such a good base on it now.
And yes, I can also concur with your friends’ experience. At my recent place I put down the 3″ minus rock first, but only ran the tractor back and forth over it. And yes, that 3″ rock is endlessly coming up through the 3/4″ minus, and the crusher dust I layered on top!
So for the 1000 lb plate compactor you rented – was that a separate machine? Or is that an attachment you put on your own tractor?
It’s good to know that packing it down like that can make such a difference though, I will definitely keep that in mind.
We rented the compactor from United Rentals, it is a seperate machine, but we did use a tractor to lift it off of the trailer that we brought it home with, it was heavy!
My horses are barefoot so seedy toe is a problem with any sort of grit. I live in England and have winter paddocks. Top soil has been removed and 2-3″ stone laid down with willow or other non-poisonous wood chips laid on top to depth of 6-12″. They rot down naturally and every year to 2 years they are scraped off and easily spread on fields or neighbour puts on flower beds or I put on stone farm tracks to prevent water erosion but not too thick. Rotted chips basically become soil. I didn’t use a membrane and probably would in the future. I would put drains (herring bone or french) if I did it again just to avoid water logs. The chips are soft and they can lay on them but more often they pee on them. The paddocks are in one area on a slant so if the chips get a bit tired and over wet I can shovel out the wetter edges. This system still involves some heavy work but it is sustainable. I tend to scrape old chips off at end of summer because with wind and sun a lot naturally disappear. Best to get new woodchips and not from a poisonous tree and without any greenery. They can get a little waterlogged mid winter and usually it means they are old and not as absorbant and I take the depth down. It does require maintenance but is sustainable. For a 20×40 metre area I would put 20 cubic metres.
I tried sharp sand one year on top of hardstanding but it doesn’t rot down and just gets dirty and heavy to shift. I would not use it.
Awesome feedback! Thanks so much for sharing your methods and experience. Are wood chips the same thing that we call hog fuel or bark mulch here?? Because a farrier with lots of experience with it says it’s too acidic for the horse’s hooves…. Nevertheless, if it’s working well for you, then it’s always good to have options 🙂
Catherine here. I live in Ireland where we have a wet mild climate. I have just purchased a house with 2 acres. As I have 2 horses I intend to build a small turnout paddock for the winter months. All your information is invaluable, thank you very much. It is fantastic that you took the time and effort to go into such detail. I will probably go with the princess option , again thanks a million.
You’re very welcome Catherine! Please let us know how it goes for you. You might also want to look into the Paddock Paradise, or, Walking Track system. See the video at the end of this post here from a woman who also has 2 acres:
great info, i really appreciate you sharing with others as it takes time to post such info with pictures, too. I have 3 acres and am looking to create a drylot for my 6 sheep 🙂 Leaning towards the princess option, or somewhere inbetween. Thanks! 🙂
Thank you for your great article!!! I’m in Virginia, USA and have been researching what to do for the muddy parts of our barn and our sacrifice lot. We don’t have as much rain as you all in the NW but we do have LOTS of hills and so we get drainage across our fields. We have a rescue donkey and rescue OTTB that love to roll in mud — but after 4 days of rain, it’s too much mud! (normally everything here gets wet from rain, but dries the next day to hard surface). This has been SO HELPFUL!!!!! and I love the photos!!!! THANK YOU!!!
Just what I needed for my muddy hillside Tennessee horse farm. Just beginning to figure out what my best plan is. This will help tremendously. Thanks you so much!
Hi Suzy! I am also a muddy hillside east Tennessee horsefarm owner. Just purchased Nov of 17 and boy it was a wet muddy mess for my 3 because I only had one month to get so much done before I could move them in.
I have been doing research on the geogrids and stumbled on this wonderful and very helpful ariticle by Jini… Thank you 🙏
I am curious as to what you went with if you could let us know.
Thank you very much for this information, I am in Colorado, down on the plains, so we don’t get a lot of rain, but for sure the snow then the horse’s runs fall apart. I started with the crusher fines, but have not been happy with the pee spots, so I’ll go back and do the pea gravel, or maybe put some sand down in the pee hole, then the next 2 layers? I like the fines so far for helping with the mud, but for sure am trying a longer term solution. I have a small boarding facility, so I have 12 runs to deal with and budget is a concern, but I also know having to do it twice costs more because of mistakes lol
If you have hard ground underneath, you may be able to get away with 2-3 layers of gravel:
Bottom: Large roadbase (3″ minus)
Middle: 3/4″ minus gravel
Top layer: Crusher Dust
But if not, then you’re going to have to put down either geotextile cloth, or the plastic grid mats – and then lay your gravel. Or for sure you will be re-doing every year. Would love to know what works for your climate/conditions… 🙂
Hi Jini, I too live in eastern Colorado and would love to try the paddock recipe you’ve provided for this area. How thick does each layer need to be? Thx, Kimberly
Hi Kimberly – see points #4,5,6 in the first section: Create a Dry Paddock in even the Rainiest Climate. I think your climate is a lot drier though and you get snow/ice most of the winter, right? So you could probably get away with less for each layer and maybe don’t even need the 3″ rock…
Perhaps just 3/4″ minus gravel laid 4 inches deep and 2 inches of crusher dust (1/4″ minus) on top would be sufficient?? I would still do the Nilex barrier cloth as the bottom layer though, and clear down to hardpan.
Hi Jini, it’s been almost a year since I did my paddock, I used your recommended amounts/measurements, minus the Nilex barrier cloth, and it’s been great. My 2 boys don’t poop in their 24’ x 36’ paddock area so I can’t comment on how much base I lose to a manure fork. I’m very lucky they have enough room to go elsewhere than their stalls/paddock. Thanks for the great advice, now I have no more muddy mess around the barn! Kimberly
Hi!
I have found your article here really helpful!
I live in Maple Ridge and I am about to attempt this for my two horses on a rental property…
Their paddock is 8000 sq feet, so cost is definitely an issue.
I have already tried to scrape down a few layers last year and dig a trench through the center of their paddock but it hasnt worked as i didnt grade the area well enough..
I have hired a contractor with a huge tracked skid steer who specialises in fine grading to fill my trench back in and grade and scrape their entire paddock so that it has a nice gentle slope.
I have been debating over whether i need Geo-textile or not, as some areas are fairly hard but some seem to have some clay…
I am considering using 3″ deep of recycled 1″minus concrete directly on top of the fresh scraped and graded ground compacted with his skidsteer and then adding 3″ deep of crusher dust or sechelt sand to the top..
what do you think? how essential is the geotextile if you have scraped down a few feet?
appreciate your thoughts on this.
Again, this article is fantastic!
Best,
Alicia
After just completing yet another experiment, I would say the Geotextile is non-negotiable!! Seriously, DO it. It doesn’t matter how much you scrape and pack, your gravel (even 3″ road base!) will disappear and every year you’ll be laying new gravel. But then you’re hooped, because you just won’t be willing to scrape away $2,000 worth of gravel and start again with the Geotextile! I have been on two rental properties and each time didn’t think it was worth doing the geotextile, but even if you only stay 2 years, it’s worth it. Either that or you need to lay the plastic drainage mats – but that’s even more expensive. Also be sure and check out our French Drain post as that worked brilliantly and may replace your trench:
Great info. A couple of months ago (prior to reading this) I leveled the walkout paddock area and laid pea gravel 6” deep under the roof and 4” beyond which will be exposed to a lot of rain in winter. I forget the size but it’s small enough to fall through the manure fork. Only a few don’t fall through. So far so good. My mare has Cushings and sometimes laminitis. Since putting the pea gravel down her feet have improved a lot as the little rocks act like ball bearings and roll around under her feet instead of sticking causing pain. This is a boarding facility so all my expense. Now I’m going to moving my other mare over so wanted to check what’s the best footing as I live on Vancouver Island, the place with the most rainfall on the planet. Winters are horrible for mud so I won’t be caught off guard again. I’ll be staying with the pea gravel for sure. Just wondering about freezing. Which is less likely to freeze. Gravel or 5 ml washed sand. I want a common sandy area as well so they can enjoy a good roll with no dust.
Hi Pat, if you just laid the gravel, but no geotextile cloth underneath, you’ll get one good winter out of it, possibly two. Don’t be tempted then to just throw more gravel down, thinking it’s got a good base now. I’m on year 4 of doing that – and it just keeps disappearing into our rain-soaked soil. Regarding freezing, when it gets below zero, it all freezes. But mine prefer to lie out in the field on the frozen mud, so perhaps sand would be better – it would be warmer for sure and I think that plays a big part in their choice.
Hi Natasha, I think that will get you through at least 1-2 winters (in the worst rainy climate). Only consideration is to put down rubber mats on top of the gravel in high traffic areas (eg around feeders) as that is where the horse’s hooves can punch through the gravel and the geotextile cloth starts to get uncovered in spots. If your horses are restricted to a small area, they may then start pulling on the cloth to play with it. Boredom = monkeys 🙂
If you can maximize drainage OUT of your gravel areas (using sloped land, French Drains, etc), then it might last a lot longer. Here’s my French Drain post if you need it:
Great article. I have a paddock area that has nothing but mud now, especially after heavy rains and whenever the snow melts. When it gets real cold and freezes up, it’s nothing but thousands of frozen footprints that they can hardly walk on. I’ve been researching every option, trying to come up with the best (and economical) course of action, so I apreciate your in depth article. It’s the best info I’ve found. I think the three layer option seems to be the best.
I have a horse and donkey. They are never locked up and only have a run in, that is in the paddock. This hole area is low. Most of the mud is next to the outside wall of my run in, so the water goes right under it and inside the run in; so in other words when it’s wet, they have no escape from it.
My question is this: When I do the paddock area with the 3 layers of stone like you explained; what do you recommend for inside the run in? Should I do the same thing, or should I do something different like sand or pea gravel? I’d like something that would be most comfortable as they sometimes stay in there for a longer period of time, like heavy rain or cold windy days. It would also seem to be easy to clean.
Hey Rick, so pleased it was helpful! I think your main question/determinant for the run-in is whether they lie down in there? AND does it need the same amount of drainage capacity as your paddock, or less? If it has to cope with as much water as your paddock, then go ahead and do it the same as they likely won’t be trying to lie down on it anyway. But, if it’s drier and they do lie down in there, then yes, a really small, smooth pea gravel or sand would be WAY more comfy for them.
Post some before/after pics for us if you can 🙂 You can upload them right here.
Thanks for the response. They don’t lie down in there and only really use it for a shelter. It gets as wet as the paddock, so the same footing will probably be best. When they lie down, they go to the higher ground.
Sounds like a plan. I would love to turn one of my ‘higher ground’ areas into a huge covered area with drainage footing and then 8 inches of sand on top – just for them to use to lie down 🙂 Maybe someday…
No the woodchips are not from the bark which is very tannic. The size ranges from 1″ to 3″ and ultimately best from a company that screens it for horse gallops (Dormit woodfibre in UK supplies a lot for arenas and gallops). You have to be sort of careful of sharp twigs if not screened but I have not had any problems over 19 years. A local farmer grows willow (hardwood and quick growing) which is not poisonous and originally chipped it for power stations but they had special moisture parameters he could not meet. The key is to get it deep enough so top layer stays dry but enables urine to work on chip below which in effect exchanges wet for decomposing chip. You could not just have a few inches deep like a shavings. It needs to be 6-12″. Too much depth doesnt matter so much indoors and I had a barn I never had to dig out. All I had to do was put fresh on top. The urine rotted the bottom chips which then decomposed through absorbing wet. But outdoors slightly more tricky over time as wet climate works on absorbancy of chip too besides the urine. You need good quality freshly chipped. No bark or greenery. Occasionally if on slope older spent chips need shoveling up but they can go on ground, gardens, hardcore roads. Obviously droppings always need removing.
This is fascinating! I’ve never seen 3-inch woodchips for sale anywhere in the Vancouver area. I hear what you’re saying though and why it would work well. I’d love to see it in person. Do you have any pics you can upload? Or email them to me and I’ll upload them: service@listentoyourhorse.com And do you have any pics of the barn you never had to dig out? So interesting!
A barn I had advised on brought in a chipper to make custom chips this size. It worked well for them as they were just there for a few years. Have to be careful, I’ve seen a smaller piece (at another barn) of chip get wedged up hard in between the bar and frog. Horse was very lame.
Thanks so much for your article. I’m doing some research on how to sort out the high traffic area of stall threshold in a barn I just started managing. The horses have lovely pea gravel paddocks with in/out access. The pea gravel has to be changed over to new, clean material every few years, I think. Our farrier does not love the pea gravel. He says it grinds away at their soles and bars in particular. We are going to try a small portion of one horses paddock in a different material and I’m considering the drainage panels you mentioned. I was at a different stable where the horses just pulled up the barrier after digging down to it. They went deep to get it too!
I’m definitely going to send your article to my boss and see what she thinks. Thank-you!
Honestly, the best solution is concrete – all the stables in the UK (same climate) use concrete for high traffic areas. And yes, your farrier is correct – but that is one of the reasons I LOVE gravel; it allows the horses to self-trim. I only had the farrier out once this entire year and even then one of the horses didn’t need anything – the rest of the time they either self-trimmed or I helped them out with a touch-up here and there. BUT mine have extensive gravelled areas – so depending on the area you gravel it may not have much effect, or, it could reduce your farrier bills 😉
My horses don’t wear shoes. Pea gravel is so good for their feet. We put down road base then put pea gravel on top. It’s working out perfectly. You have to pick up manure everyday but so worth it.
I’m so happy I found your website! We just had our stable built, with excavation down to the hard soil. I live in western Oregon and am oh-so-tired-of-mud and looking for an affordable mud free paddock recipe, so to speak. I’ve heard gravel and have been avoiding it, but I am now considering it from your article/blog. I have been considering french drains as well. I want a one time solution with not a massive upkeep. I’ve noticed those small plastic grids to lay on the ground surface to fill with gravel but they are pretty spendy. Which made me think nursery pallets > easier and cover more space and probably a lot cheaper. Since I am not a millionaire, and I’m weighing in on what direction to go, the gravel layers actually seems pretty affordable with less maintenance. What is your thoughts of the grids and french drains? I also heard about the geocloth but doesn’t look successful. I forgot to mention our new barn has 12 stalls, so this will be 12 paddocks. I’m open to hear any new tips you may have to for my situation.
Just hold on Sue, I’ve got a guy coming out this week who contracts with the city here to create all their parks with horse trails, drain peat bogs, etc. I’m going to pick his oh-so-experienced brain and see if he knows anything we don’t already know – or has some tips or tweaks that make a world of difference. I’ll report back!
Btw, nope, he doesn’t know anything that’s not already in this article. And yes, because horses hooves pound gravel and shift it around unevenly, eventually you will have spots where the geocloth is exposed – usually at the edges of an area.
The other important thing with gravel, is that it requires regular grading/maintenance. Scrape off the dirty layer (from dirt and small bits of manure) and re-surface/grade. Add more gravel from time to time. The frequency of adding more gravel depends on the activity level of your horses. The more frisky/active your horses are, the more they tear up the gravel. With an older or sedate herd, maybe you’d only have to top up once ever 2-3 years. With my crew, I need to add a layer of fresh 1/4″ minus every Fall.
Great info. Because this is the most informative article I’ve read I was curious what you would recommend under stall mats. The discussion seems to be wide ranging and I would appreciate your thoughts. I am considering granite stone dust or 89 Bahama at the moment which is a crushed coral product from its namesake.
Okay so when you say “stall mats” we’re talking about a completely enclosed area – 3 walls and a roof, right?
So you’re not looking at any wear from weather elements, just urine and hooves. In that case, I think it would depend on how your drainage is set up from your stalls… A barn with good drainage probably requires a different material under the mats, than a stall with poor/no drainage.
What are the environmental impacts of using a coral reef product? I know nothing about it, so I’m just asking you questions to stimulate your thoughts/research. Also can you find any forums or message boards where people have experimented with both?
Sorry I haven’t seen or experimented with stall footing. But let us know what you find out!
Yes three walls and an open stall doors to the outside. Our horses can come and go as the please into the paddock and back out into the property. Currently the stall area floor is stall pellets that are wood based mixed with shavings all from the local Tractor Supply. At the base it’s currently just packed dirt. The biggest issue is the immense amount of dust generated in the stalls. It’s just not healthy for the horses or us for that matter. So the plan is just to do stall mats in the 12×12 stall areas. My dilemma has been what product to put underneath. The Bahama product is a coral based limestone type rock it is not harvested as live coral it is basically rock mined like any other rock product and is then shipped and widely used for landscape purposes such as driveways and underneath pavers. It packs decently but also isn’t as sharp edged so it gets used in beach areas where there will be plenty of bare feet. I also have access to granite based “stone dust” and of course limestone and just about any other rock, sand or clay material. All of the rock based products are close to the same price being within 10 dollars a yard of each other. There are many opinions of course as to which is best, in fact it can be a bit overwhelming at times so I would appreciate any guidance. I totally understand that opinions are just that but yours is certainly very informed. Thanks for your time.
Ok so I’ve spent some time thinking about this, but I don’t think you’re gonna like my answer! I have put rubber mats down on every different gravel footing I’ve tested and they always move and become uneven. Because ALL ground sinks and displaces unevenly as weather and moisture changes. Especially as 1,000 lbs in concentrated disks punches down on it.
So the only surface I’ve seen work is concrete. And of course, to prep for concrete you have to do layers of gravel, then the concrete, but it would likely be less gravel/limestone than if you were putting mats right on top of the gravel.
The only other option I can think of, is to save your money on the material underneath and put that towards having custom-cut mats that fill the stall, wall-to-wall in one piece. So then when the ground shifts, it may develop sink spots, become wavy, etc but it doesn’t matter since your mats are one piece. Uneven ground doesn’t bother my horses at all. But trying to clean gaps in rubber mats that are shifting as the ground shifts, becomes a BIG hassle. Yes the mats may pull away from the edges/wall as the ground underneath becomes uneven, but I’m thinking that would be less hassle than multiple join-lines separating.
Course you could always do gravel this year – whatever packs down solid the best (in my region that’s barrier cloth, followed by 3″ rock, then 3/4″ minus gravel followed by 1/4″ crusher dust) – and see how it goes with the mats on top of that. If it doesn’t work well, then next year, pour concrete and your gravel base is already done. You may also be able to get away with just doing 3/4″ minus and then 1/4″ crusher dust if your subsoil (hardpan) is hard and not too deep.
Well, keep me posted if you can and let me know what happens!
Thanks for all the valuable info. We’re doing the paddocks now using your advice. Still deciding on what to put on the top. Thinking about limestone gravel or C30 sand. Right now we have geo textile underlaymen, 5” 1 1/4 gravel and 5” 5/8 gravel. However horses oversized the manure on the 5/8” gravel and real difficult to get it all off the gravel which should e an issue. Any advice?
GAH – this is the bane of my existence! And the only thing you can do to remedy it is to pour concrete on top of your gravel – that’s my ultimate plan, when I have my own place and enough $$ to do so. If you look at horse stables/properties all over the UK that is what they do.
Second thing that can really help – I was able to do this when I had 5 because there was enough space for everyone, but it no longer worked with 11:
Unfortunately, my landscaper/road builder/horse trail builder guy says that you need to scrape off the dirty layer of gravel at least once a year, and re-grade where needed. I have lost so much gravel from throwing it out with the manure, I highly suspect we’ll need to put down a load of crusher dust after scraping/grading this year.
Wish I had better news for you! BUT if you can teach them where to poo that could buy you 2-3 years before having to scrape/freshen. Let me know how it goes!
I had my area done 2 years ago. Scraped out dirt, put in drain, geotextile, big rocks, then 57s, then screenings. Problem is, it doesn’t pack down the way I’d like. This year added more 57s, more screenings. Same issue of course. What can I use as a surface layer that will pack down fairly hard and not get cut up by hooves?
What are 57s Judy? I’ve not heard of that. The thing that packs down the hardest – especially if you water/soak it and use a 1000 lb compactor – is Crusher dust. Which is 1/4″ minus crushed gravel with the fines (rock dust). Make sure you don’t get smooth-edged crusher though – it needs to have the jagged/irregular edges to pack properly.
Having said all that, if you have an active herd like mine and you’ve got an area that’s sheltered from rain… they’re still going to move it around and carve it out over the winter. I wish I had better news for you. But I’m afraid the only thing that is maintenance-free is concrete!
Thank you so much for your extended read! So much good information (all based on experience with horses, which is good).
I haven’t read all of it yet, but for raking leaves that is very labour intensive I would suggest a leaf blower. Also handy in the shed to clean out all dust.
That is a good idea – however I have an intense dislike of the noise of leaf blowers! So I would rather rake and sweep. But thanks for sharing as I’m sure others on here may love the tip 🙂
king county (washington) considers gravel non permeable and wants you to get a grading permit to add any gravel.
be very careful
I asked a phd in geology who has worked a full career in geology. He was stunned by the county thinking gravel is non permeable and says they are dead wrong.
But that is the law.
I only bring this up because who would ever think that doing the right thing for your horses would be against the law.
Wow that’s crazy! Might be a case of “don’t ask… apologize later… if you have to” Some of those bylaws are aimed at developers though and they may not bother with small usage… it varies though, some are more rabid dog about it. I know another one of our readers in Washington had the county pay for her gravel! They have a program that subsidizes horse owners to improve drainage.
A really interesting topic, and I have a question: is gravel 4/3 & 4/1 good as an alternative to fine sand in horse rooms, or is fine sand better? I live in a dry, desert region in the Kingdom of Saudi Arabia and I have purebred Arabian horses
When you say “horse rooms” I’m assuming you mean stalls or stables? I think for small, enclosed spaces like that, sand and/or rubber mats would be better – because the horse needs to lie down on it. Especially Arabians, with their fine coats and sensitive skin, they’re not going to do well lying down on any kind of gravel. As long as you keep their hay off the sand (hay nets with a large bucket or built in container to catch escaped hay underneath?) it should be good. Post a picture of your horses – I’d love to see them!
Thank you for the clear answer , and it is my pleasure to present you an invitation to visit the Kingdom of Saudi Arabia to see the Arabian horses in their first homeland.
Beautiful! The two in front look taller than usual…
Thank you so much for the invitation, but I will have to wait until I can afford my own plane (or fractional jet ownership!) since there is no way I will ever have a covid vaccine 😉
This is an amazingly helpful article! I was all ready to order my gravel and tractor (my two new horses arrive at the end of April) until I read that you shouldn’t do this work when the soil is muddy. Should I let my horses have one season of muddy feet and wait till summer to do the work? Or should I risk making even more mud and do it now?
Thanks so much for your help!
Larry
Ah glad you found it Lawrence! I received your email, but no need to send the link now I see. If they’re coming end of April, you’re well over the worst of it. I would definitely wait until August and do it then. It doesn’t matter how much they churn it up now, by end of June you won’t notice a thing is amiss! It will all look normal. And that should be no problem for their hooves either – it’s such a short time. Congrats though and how exciting!
Thanks Jini! That’s a relief. Now I can focus on other things (water, feeders, trailer, star thistle, fences)! Your site is so inspiring and YOU are so generous!
Btw, did a little research on star thistle as I hadn’t heard of it, and I think the important point here is how MUCH the horse would have to consume to be negatively affected:
“The exact chemical compound responsible for toxicity in Russian knapweed and yellow star-thistle has not been defined; however, a sesquiterpene lactone, repin, is believed to be the key neurotoxin present. The toxic effects of Russian knapweed and yellow star-thistle are cumulative, meaning that poisoning normally results when levels of the toxin build up in the body over time due to horses routinely grazing these plants.
Horses must consume relatively large quantities of the green or dried plants before the toxic threshold is reached. It has been suggested that a horse must consume 60% of its body weight in green Russian knapweed plant material before toxicity symptoms appear. For yellow star-thistle, toxicity symptoms may arise after horses have ingested 85 to 100% of their body weight in green plant material. Once these thresholds are reached, disease symptoms have a rapid onset.” Source: https://aces.nmsu.edu/pubs/_b/B710/
This is where we can choose to support our horses in a wholistic manner. If we have low-sugar hay in slowfeeders/haynets available 24/7 then our horses do not have to eat toxic plants to assauge the acid in their gut. They are then free to honor their body wisdom and *listen* to their body because they are not in physical or psychological scarcity.
My horses are surrounded by toxic plants – not one of them has ever become sick. They also know WHEN to eat a plant – some are not toxic at first growth in Spring and only become toxic as they approach maturity. Every one of my 11 horses knows this.
The other way to look at the ‘weed’ issue is from a soil ecology perspective. Ask yourself WHY your fields are hosting these plants? HOW are these plants, actually helping or addressing an imbalance in your soil? The solution is often not to remove them, but to heed their message and increase the health of your soil. A great book to give a whole other perspective on this is Wilding by Isabella Tree.
Thanks for the interesting discussion. My questions are as follows: if I use your advice of geotextile fabric with layers of gravel am I going to get washing of the fine gravel on the slopes with heavy rain? Can anyone comment on the use and longevity of products like “Lighthoof”? Perhaps in smaller, high traffic areas concrete is the cheapest long term solution!
Thanks for the discussion.
Paul
Hey Paul, if your fine gravel locks together (i.e. NOT smooth edges, with dust fines) then I haven’t seen any movement even in heavy, weeks-long rain. HOWEVER, now that we’re heading into 2022, I’ve had almost 3 years with the professional job that Mitchell did… and the geotextile cloth is coming through. Because the 4″ of gravel that was on top, has either been moved around by punchy horse hooves, or been thrown out along with manure that breaks down into tiny particle sizes. I am totally disillusioned with any gravelled solution now. Unless you are willing to have the top layer scraped off (and evened out again), and new crusher dust (1/4″ minus) laid down every year ($$) it’s just never going to work well in a rainy climate. If you can afford concrete I would 100% go with that!!
I really appreciated this article. I read it for research in preparation to write a blog post about a horse farm that uses 1/4″ minus for their horse arena and event venue. I write for a quarry and sand-and-gravel operation.
If I could add some thoughts based on my experience working in the sand-and-gravel business:
One thing I noticed is that the 1/4″ minus you initially used is a crushed drain rock rather than a quarried rock. Like you mentioned, it has blunted edges and won’t compact as well as a 1/4″ minus quarried rock. The crushed drain rock is going to roll more than the quarried rock. An easy way to tell the difference is that crushed drain rock is usually variegated (the grains will have multiple colors) while a quarried rock will mostly consist of the same color hue.
Like you mentioned, 1/4″ minus is dense and will definitely not drain as well as a coarser product. And it will drain even less well if it’s quarried rock rather than crushed drain rock. Gravel is bound to have runoff, so your installation of a French drain was a great idea.
For sure, a base layer of well-compacted, large, well-draining rock would have helped prevent the 1/4″ minus from being taken over by the mud so quickly. I would suggest a coarse, crushed quarry rock or crushed drain rock for a base rather than drain rock or pea gravel, especially for an area getting a lot of traffic. (See my notes about permeable aggregates below.)
In the section about using two layers of footing/drainage, Dr. Swinker mentioned using a coarse road base and a finer layer on top. This reminded me of the two-part base Washington Rock makes for turf sports field. The bottom layer is called a permeable aggregate base coarse and the top is a permeable aggregate top coarse. (Aggregate = rocks; permeable = allows water to pass through.)
The perm agg base coarse is basically a coarse 1-1/4″ minus, and the perm agg top coarse is a coarse 5/8″ minus (basically a 3/4″ minus). The two layers lock together and when compacted, created a smooth surface for turf to be laid on top of. So the layers act as a well-draining foundation.
You could possibly place a third layer of 1/4″ minus (what we call trail mix gravel) on top of the permeable layers. In muddy areas, perhaps you would even start with 2″-4″ quarry spalls (basically what you refer to as a 3″ clean rock; clean means “doesn’t have fines”).
Thanks again. I really appreciate the knowledge you shared.
Thanks so much Eve, for stopping by and adding your wisdom/experience to this conversation – much appreciated!
It’s a shame that gravel/aggregate companies around the globe can’t use the same, standardized terminology, that would make sharing information and understanding things a whole lot easier for those of us in the UK, Australia, Canada, USA etc!
So true! Even I get confused. I’m mulling the idea of doing a video/blog post just about gravel terminology and what it’s called in different areas. It wouldn’t be the most interesting thing I’ve ever written, but it might be useful.
It was great to read such an informative article. I am in the UK. We have been using cheap quarried chalk (local limestone) and compacting it on site. We have used it both inside the barn and outside. Our horses stay in the barn overnight in winter and are out during the day, and this is reversed in summer so the horses graze when its cooler at night. Over the last two years we have found that the compacted chalk works well under a straw bed inside. It is still porous so urine soaks through reducing the need for bedding removal. Outside is not so good; it gets slippery when wet and is even worse when it freezes so this year I have put some gravel/sand mix on top of the chalk in some areas and so far that is performing better.
Fantastic information Pippa – thanks so much for letting us know! I haven’t used chalk limestone at all. I heard the local racetrack likes to use it, but they are also grooming the track daily. It makes total sense though that it would be slippery when wet/freezing. And I would think you’d want to use sharper-edged gravel (not smooth) so it can bite into the limestone and hold… I discovered this by adding a load of smooth gravel on top of my crusher dust (1/4″ gravel) to see what would happen, and it just slid around and was useless.
Thank you for your response. The sand/gravel mix we have used is called Hoggin here and the best description I can find is on Wikipedia: https://en.wikipedia.org/wiki/Hoggin
Very interesting Pippa. It certainly looks ideal for walking paths, I’ll be interested to hear how it stands up to your horses’ hooves. Keep us posted!
Best article ever- I needed up making it a little simpler and doing geo textile then 6 in granite fines and have no mud in my barn yard-
But now I need to gravel the paths on my property- very occasional pick up truck traffic , mostly will be riding on these – Im thinking 1/2 in angular rock well compacted– 2 inches then 2 inches of granite fines on top of that?? What do you think?I will have gravel drains or hydro blow running across the roads to drain them- Really appreciate your help-
Well first of all, paths don’t need any less treatment than your barn yard if you want them to say mud-free. If 2 inches of 1/2 inch angular rock plus 2 inches granite fines (so 4 inches total) would work in your barn yard, then it will work on your paths. Of course you can always start with that and if it’s not enough, then add more on top.
The only other consideration is if you want to bring a heavy truck on the paths – in that case you definitely need to go with a layer of 3-inch minus road base, then whatever you want on top of that for your horses’ hooves.
I recently joined a horse track group and there was a post on fleece lasagna and how well it works in boggy areas , gateways and lane ways! Have you ever read about this? I guess it goes back for centuries in the European countries and the lady that wrote the list was from Scotland. She said most of the time you can find sheep herdsmen to give you the fleece for free. I am sure alpaca or lama might work too? Thought it was super great idea and she layered it with old hay/brush/sticks and other stuff (hence the lasagna reference) and said it had held up for two winters now! Of course here in our dry part of California I don’t really need it but thought it might really help some of you in the wetter climates? ✌🏼💚🐴
Well wool holds 40% it’s weight in water, so that makes sense. However, I can’t imagine anyone giving away fleece for free around here! It’s usually worth quite a bit of money.
Excellent article, and appreciate the ‘before and after’ pics. During the rainy season in the Western NC mountains, the mucky, suck your boots off, red clay is the bane of my existence. It permanently stains anything it comes in contact with (shoes, clothing, white horse feathers). I’ve always used crusher run—it’s pretty, soft (good for the horses to lie on and me to fall on), keeps their hooves impressively manicured, and easy to clean (kinda like scooping a giant litter box). Also goes a long way to keep down the fly/flea population. As you’ve shown, it doesn’t hold up well, but it’s not expensive to replenish here ($250 per 16k lbs.).
One word of caution: I’ve been using it for 6 years, no problems, but recently, recently, almost lost one of my horses to colic. Vet found him full of crusher run. I‘ve always fed both of my horses soaked hay cubes from feed tubs, along with free pasture access. We don’t know if it built up over years of ingesting a little at a time, or if he somehow swallowed a whole bunch at once. He’s recovering, but it’s been a slow, agonizing process. I don’t know if this will help anyone, beyond being aware of it, as I’m not sure myself how to prevent it. Currently, I’m adding bran and mineral oil into the hay cubes, and also doing the once a month ‘Sand Clear’ (for both horses, as a precautionary). Thanks again for the very informative article!
Thanks so much for sharing your experience. I think it also depends on the crusher – I got one load that was insanely dusty, I was concerned about them inhaling it. Luckily it rains so much here that the dust quickly disappeared, but in a drier climate it could certainly be a health hazard.
Another thought: Do you offer your horses free choice minerals? Like Hoffman’s? I wonder if he was eating the crusher seeking to address a mineral deficiency… You can just offer the plain (unflavored, no molasses) basic Hoffmans Minerals in a feeder/bucket in a covered area and let them help themselves. When the wildies came in they hoovered the minerals at an incredible rate for about 8 weeks and then normalized – they ate more in 8 weeks than the next 2 years! So they obviously had serious deficiencies (their hooves were pretty bad too and thin tails).
Use geotextile for enhanced filtration and erosion control when constructing the arena base. You can then layer it with geocell to prevent pooling and unstable ground. Using these products together will prevent freezing by allowing for proper drainage without needing a french drainage system.
Thanks for such an amazing article! I noticed in a couple of the comments you recommended concrete as the lowest-maintenence option – I’ve read that it’s not great for horses (donkeys, in my case) to stand on hard concrete for long periods of time – do you know anything about that? I’m tempted by the seeming “once and done” nature of it and also by the idea that it’d be easier to keep clean, but I don’t want to hurt their feet (which are already sensitive and very prone to thrush).
Yes, well the thing with concrete is people use it for walkways. If it’s inside a stall, or around a slowfeeder, where horses or donkeys will be standing for long periods, then they layer a softer material on top.
Most do 3/4″ thick rubber mats (these work great on top of any surface, including rocks) and if the horse is lying down, then they add straw or shavings as well.
I recently did a podcast with a woman in rainy Oregon who bought a bunch of the mud mats and she confirmed they work great. Good luck!
 If you live in a climate that only gets occasional rain, or a short rainy season, then you may be able to just lay either a commercial-grade shielding fabric or a specialized plastic draingrid on top of the hard pan soil, then layer 2-4 inches of 3/4 inch minus pea gravel and top that with a 2-inch layer of 1/4 inch minus limestone gravel, or crusher dust.
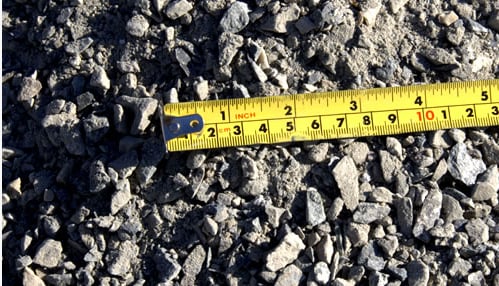


That was a very interesting read! I’m curious to know if you ended up redoing the paddock surface area this year again? And what you used.
I redid an arena 4 years ago and after MUCH research we went the 3″ minus with an “arena mix” of sand and fine gravel on top. (from Kelmor in Chilliwack) We did not do a geo textile cloth (although I had one in my first hog fuel arena). My arena is also used as the dry area on wet days and overnight hours, I am very happy with my surface.
One thing that I did and would highly recommend is after having the 3″ minus delivered we rented a 1000 lb plate compactor and compacted the arena surface for a full week, many, many, many times. The sand was dumped and spread about 2 weeks later. This was an important step because without it the large 3″ minus rocks will slowly start to surface to the top and will need to be “picked” before riding / turnout. I have friends who have used almost the same formula but without the compacting and have to pick the rocks regularly (at least weekly, if not more often).
It has great drainage, and my one complaint is that it gets dusty in the summer, but I consider that a small price to pay for a dry arena in the winter.
I have also not had to top it up in any way, although I pick manure daily, and also harrow it weekly as I don’t want to mess up my base by having “holes” in my sand from the horses playing out there!
I live in Chilliwack, so have the same weather as you 🙂
Great info Donna – thanks so much for sharing your knowledge! I have since left that boarding place, but the owners (who bought their own horses after being inspired by mine) did indeed dump 4 more boxes of crusher dust on that paddock ($1400). It’s holding up well though and perhaps they will only need to re-do it every 3-5 years now; since there’s such a good base on it now.
And yes, I can also concur with your friends’ experience. At my recent place I put down the 3″ minus rock first, but only ran the tractor back and forth over it. And yes, that 3″ rock is endlessly coming up through the 3/4″ minus, and the crusher dust I layered on top!
So for the 1000 lb plate compactor you rented – was that a separate machine? Or is that an attachment you put on your own tractor?
It’s good to know that packing it down like that can make such a difference though, I will definitely keep that in mind.
We rented the compactor from United Rentals, it is a seperate machine, but we did use a tractor to lift it off of the trailer that we brought it home with, it was heavy!
Good to know – thanks Donna!
I used crushed concrete, it packs tight and has a sieve characteristic.
Wonder how that compares price-wise to the 1/4″ minus? I guess it would vary from place to place. But good to know it’s an option! Thanks.
My horses are barefoot so seedy toe is a problem with any sort of grit. I live in England and have winter paddocks. Top soil has been removed and 2-3″ stone laid down with willow or other non-poisonous wood chips laid on top to depth of 6-12″. They rot down naturally and every year to 2 years they are scraped off and easily spread on fields or neighbour puts on flower beds or I put on stone farm tracks to prevent water erosion but not too thick. Rotted chips basically become soil. I didn’t use a membrane and probably would in the future. I would put drains (herring bone or french) if I did it again just to avoid water logs. The chips are soft and they can lay on them but more often they pee on them. The paddocks are in one area on a slant so if the chips get a bit tired and over wet I can shovel out the wetter edges. This system still involves some heavy work but it is sustainable. I tend to scrape old chips off at end of summer because with wind and sun a lot naturally disappear. Best to get new woodchips and not from a poisonous tree and without any greenery. They can get a little waterlogged mid winter and usually it means they are old and not as absorbant and I take the depth down. It does require maintenance but is sustainable. For a 20×40 metre area I would put 20 cubic metres.
I tried sharp sand one year on top of hardstanding but it doesn’t rot down and just gets dirty and heavy to shift. I would not use it.
Awesome feedback! Thanks so much for sharing your methods and experience. Are wood chips the same thing that we call hog fuel or bark mulch here?? Because a farrier with lots of experience with it says it’s too acidic for the horse’s hooves…. Nevertheless, if it’s working well for you, then it’s always good to have options 🙂
Ladies
Catherine here. I live in Ireland where we have a wet mild climate. I have just purchased a house with 2 acres. As I have 2 horses I intend to build a small turnout paddock for the winter months. All your information is invaluable, thank you very much. It is fantastic that you took the time and effort to go into such detail. I will probably go with the princess option , again thanks a million.
Catherine
You’re very welcome Catherine! Please let us know how it goes for you. You might also want to look into the Paddock Paradise, or, Walking Track system. See the video at the end of this post here from a woman who also has 2 acres:
https://www.listentoyourhorse.com/how-to-make-a-great-waterhole-for-your-paddock-paradise-or-pasture/
Or, this permaculture system:
https://www.listentoyourhorse.com/equine-permaculture-in-rainy-climates-system-for-sustainable-pastures/
great info, i really appreciate you sharing with others as it takes time to post such info with pictures, too. I have 3 acres and am looking to create a drylot for my 6 sheep 🙂 Leaning towards the princess option, or somewhere inbetween. Thanks! 🙂
Post a before and after pic when you’re done Joanna (with your sheep in it!) – that would be cool 🙂
Thank you for your great article!!! I’m in Virginia, USA and have been researching what to do for the muddy parts of our barn and our sacrifice lot. We don’t have as much rain as you all in the NW but we do have LOTS of hills and so we get drainage across our fields. We have a rescue donkey and rescue OTTB that love to roll in mud — but after 4 days of rain, it’s too much mud! (normally everything here gets wet from rain, but dries the next day to hard surface). This has been SO HELPFUL!!!!! and I love the photos!!!! THANK YOU!!!
Just what I needed for my muddy hillside Tennessee horse farm. Just beginning to figure out what my best plan is. This will help tremendously. Thanks you so much!
You’re welcome Suzy! And be sure and check out this post too as you may need it: https://www.listentoyourhorse.com/adventures-in-culvert-drainage-for-my-horse-paddock/
Hi Suzy! I am also a muddy hillside east Tennessee horsefarm owner. Just purchased Nov of 17 and boy it was a wet muddy mess for my 3 because I only had one month to get so much done before I could move them in.
I have been doing research on the geogrids and stumbled on this wonderful and very helpful ariticle by Jini… Thank you 🙏
I am curious as to what you went with if you could let us know.
This is the best article I have read on this subject!
Thanks Margaret – glad it was useful/helpful!
Thank you very much for this information, I am in Colorado, down on the plains, so we don’t get a lot of rain, but for sure the snow then the horse’s runs fall apart. I started with the crusher fines, but have not been happy with the pee spots, so I’ll go back and do the pea gravel, or maybe put some sand down in the pee hole, then the next 2 layers? I like the fines so far for helping with the mud, but for sure am trying a longer term solution. I have a small boarding facility, so I have 12 runs to deal with and budget is a concern, but I also know having to do it twice costs more because of mistakes lol
If you have hard ground underneath, you may be able to get away with 2-3 layers of gravel:
Bottom: Large roadbase (3″ minus)
Middle: 3/4″ minus gravel
Top layer: Crusher Dust
But if not, then you’re going to have to put down either geotextile cloth, or the plastic grid mats – and then lay your gravel. Or for sure you will be re-doing every year. Would love to know what works for your climate/conditions… 🙂
Hi Jini, I too live in eastern Colorado and would love to try the paddock recipe you’ve provided for this area. How thick does each layer need to be? Thx, Kimberly
Hi Kimberly – see points #4,5,6 in the first section: Create a Dry Paddock in even the Rainiest Climate. I think your climate is a lot drier though and you get snow/ice most of the winter, right? So you could probably get away with less for each layer and maybe don’t even need the 3″ rock…
Perhaps just 3/4″ minus gravel laid 4 inches deep and 2 inches of crusher dust (1/4″ minus) on top would be sufficient?? I would still do the Nilex barrier cloth as the bottom layer though, and clear down to hardpan.
Let us know how it goes!
Hi Jini, it’s been almost a year since I did my paddock, I used your recommended amounts/measurements, minus the Nilex barrier cloth, and it’s been great. My 2 boys don’t poop in their 24’ x 36’ paddock area so I can’t comment on how much base I lose to a manure fork. I’m very lucky they have enough room to go elsewhere than their stalls/paddock. Thanks for the great advice, now I have no more muddy mess around the barn! Kimberly
Oooh that’s fantastic Kimberly! SO pleased for you!! And thanks so much for letting all of us know. Every bit of feedback is useful 🙂
Hi!
I have found your article here really helpful!
I live in Maple Ridge and I am about to attempt this for my two horses on a rental property…
Their paddock is 8000 sq feet, so cost is definitely an issue.
I have already tried to scrape down a few layers last year and dig a trench through the center of their paddock but it hasnt worked as i didnt grade the area well enough..
I have hired a contractor with a huge tracked skid steer who specialises in fine grading to fill my trench back in and grade and scrape their entire paddock so that it has a nice gentle slope.
I have been debating over whether i need Geo-textile or not, as some areas are fairly hard but some seem to have some clay…
I am considering using 3″ deep of recycled 1″minus concrete directly on top of the fresh scraped and graded ground compacted with his skidsteer and then adding 3″ deep of crusher dust or sechelt sand to the top..
what do you think? how essential is the geotextile if you have scraped down a few feet?
appreciate your thoughts on this.
Again, this article is fantastic!
Best,
Alicia
After just completing yet another experiment, I would say the Geotextile is non-negotiable!! Seriously, DO it. It doesn’t matter how much you scrape and pack, your gravel (even 3″ road base!) will disappear and every year you’ll be laying new gravel. But then you’re hooped, because you just won’t be willing to scrape away $2,000 worth of gravel and start again with the Geotextile! I have been on two rental properties and each time didn’t think it was worth doing the geotextile, but even if you only stay 2 years, it’s worth it. Either that or you need to lay the plastic drainage mats – but that’s even more expensive. Also be sure and check out our French Drain post as that worked brilliantly and may replace your trench:
https://listentoyourhorse.com/paddock-mud-or-flood-problems-install-a-french-drain/
Great info. A couple of months ago (prior to reading this) I leveled the walkout paddock area and laid pea gravel 6” deep under the roof and 4” beyond which will be exposed to a lot of rain in winter. I forget the size but it’s small enough to fall through the manure fork. Only a few don’t fall through. So far so good. My mare has Cushings and sometimes laminitis. Since putting the pea gravel down her feet have improved a lot as the little rocks act like ball bearings and roll around under her feet instead of sticking causing pain. This is a boarding facility so all my expense. Now I’m going to moving my other mare over so wanted to check what’s the best footing as I live on Vancouver Island, the place with the most rainfall on the planet. Winters are horrible for mud so I won’t be caught off guard again. I’ll be staying with the pea gravel for sure. Just wondering about freezing. Which is less likely to freeze. Gravel or 5 ml washed sand. I want a common sandy area as well so they can enjoy a good roll with no dust.
Hi Pat, if you just laid the gravel, but no geotextile cloth underneath, you’ll get one good winter out of it, possibly two. Don’t be tempted then to just throw more gravel down, thinking it’s got a good base now. I’m on year 4 of doing that – and it just keeps disappearing into our rain-soaked soil. Regarding freezing, when it gets below zero, it all freezes. But mine prefer to lie out in the field on the frozen mud, so perhaps sand would be better – it would be warmer for sure and I think that plays a big part in their choice.
What do you think about compacting the existing soil, laying down the fabric, and installing the Merchant solution over top?
Hi Natasha, I think that will get you through at least 1-2 winters (in the worst rainy climate). Only consideration is to put down rubber mats on top of the gravel in high traffic areas (eg around feeders) as that is where the horse’s hooves can punch through the gravel and the geotextile cloth starts to get uncovered in spots. If your horses are restricted to a small area, they may then start pulling on the cloth to play with it. Boredom = monkeys 🙂
If you can maximize drainage OUT of your gravel areas (using sloped land, French Drains, etc), then it might last a lot longer. Here’s my French Drain post if you need it:
https://listentoyourhorse.com/paddock-mud-or-flood-problems-install-a-french-drain/
Let us know what you decide and how it goes!
Great article. I have a paddock area that has nothing but mud now, especially after heavy rains and whenever the snow melts. When it gets real cold and freezes up, it’s nothing but thousands of frozen footprints that they can hardly walk on. I’ve been researching every option, trying to come up with the best (and economical) course of action, so I apreciate your in depth article. It’s the best info I’ve found. I think the three layer option seems to be the best.
I have a horse and donkey. They are never locked up and only have a run in, that is in the paddock. This hole area is low. Most of the mud is next to the outside wall of my run in, so the water goes right under it and inside the run in; so in other words when it’s wet, they have no escape from it.
My question is this: When I do the paddock area with the 3 layers of stone like you explained; what do you recommend for inside the run in? Should I do the same thing, or should I do something different like sand or pea gravel? I’d like something that would be most comfortable as they sometimes stay in there for a longer period of time, like heavy rain or cold windy days. It would also seem to be easy to clean.
Any suggestions would be greatly appreciated.
Thanks again.
Hey Rick, so pleased it was helpful! I think your main question/determinant for the run-in is whether they lie down in there? AND does it need the same amount of drainage capacity as your paddock, or less? If it has to cope with as much water as your paddock, then go ahead and do it the same as they likely won’t be trying to lie down on it anyway. But, if it’s drier and they do lie down in there, then yes, a really small, smooth pea gravel or sand would be WAY more comfy for them.
Post some before/after pics for us if you can 🙂 You can upload them right here.
Thanks for the response. They don’t lie down in there and only really use it for a shelter. It gets as wet as the paddock, so the same footing will probably be best. When they lie down, they go to the higher ground.
Thanks again,
Rick
Sounds like a plan. I would love to turn one of my ‘higher ground’ areas into a huge covered area with drainage footing and then 8 inches of sand on top – just for them to use to lie down 🙂 Maybe someday…
No the woodchips are not from the bark which is very tannic. The size ranges from 1″ to 3″ and ultimately best from a company that screens it for horse gallops (Dormit woodfibre in UK supplies a lot for arenas and gallops). You have to be sort of careful of sharp twigs if not screened but I have not had any problems over 19 years. A local farmer grows willow (hardwood and quick growing) which is not poisonous and originally chipped it for power stations but they had special moisture parameters he could not meet. The key is to get it deep enough so top layer stays dry but enables urine to work on chip below which in effect exchanges wet for decomposing chip. You could not just have a few inches deep like a shavings. It needs to be 6-12″. Too much depth doesnt matter so much indoors and I had a barn I never had to dig out. All I had to do was put fresh on top. The urine rotted the bottom chips which then decomposed through absorbing wet. But outdoors slightly more tricky over time as wet climate works on absorbancy of chip too besides the urine. You need good quality freshly chipped. No bark or greenery. Occasionally if on slope older spent chips need shoveling up but they can go on ground, gardens, hardcore roads. Obviously droppings always need removing.
This is fascinating! I’ve never seen 3-inch woodchips for sale anywhere in the Vancouver area. I hear what you’re saying though and why it would work well. I’d love to see it in person. Do you have any pics you can upload? Or email them to me and I’ll upload them: service@listentoyourhorse.com And do you have any pics of the barn you never had to dig out? So interesting!
A barn I had advised on brought in a chipper to make custom chips this size. It worked well for them as they were just there for a few years. Have to be careful, I’ve seen a smaller piece (at another barn) of chip get wedged up hard in between the bar and frog. Horse was very lame.
Thanks so much for your article. I’m doing some research on how to sort out the high traffic area of stall threshold in a barn I just started managing. The horses have lovely pea gravel paddocks with in/out access. The pea gravel has to be changed over to new, clean material every few years, I think. Our farrier does not love the pea gravel. He says it grinds away at their soles and bars in particular. We are going to try a small portion of one horses paddock in a different material and I’m considering the drainage panels you mentioned. I was at a different stable where the horses just pulled up the barrier after digging down to it. They went deep to get it too!
I’m definitely going to send your article to my boss and see what she thinks. Thank-you!
Honestly, the best solution is concrete – all the stables in the UK (same climate) use concrete for high traffic areas. And yes, your farrier is correct – but that is one of the reasons I LOVE gravel; it allows the horses to self-trim. I only had the farrier out once this entire year and even then one of the horses didn’t need anything – the rest of the time they either self-trimmed or I helped them out with a touch-up here and there. BUT mine have extensive gravelled areas – so depending on the area you gravel it may not have much effect, or, it could reduce your farrier bills 😉
My horses don’t wear shoes. Pea gravel is so good for their feet. We put down road base then put pea gravel on top. It’s working out perfectly. You have to pick up manure everyday but so worth it.
Awesome Sherry! Thanks for letting us know 🙂
I’m so happy I found your website! We just had our stable built, with excavation down to the hard soil. I live in western Oregon and am oh-so-tired-of-mud and looking for an affordable mud free paddock recipe, so to speak. I’ve heard gravel and have been avoiding it, but I am now considering it from your article/blog. I have been considering french drains as well. I want a one time solution with not a massive upkeep. I’ve noticed those small plastic grids to lay on the ground surface to fill with gravel but they are pretty spendy. Which made me think nursery pallets > easier and cover more space and probably a lot cheaper. Since I am not a millionaire, and I’m weighing in on what direction to go, the gravel layers actually seems pretty affordable with less maintenance. What is your thoughts of the grids and french drains? I also heard about the geocloth but doesn’t look successful. I forgot to mention our new barn has 12 stalls, so this will be 12 paddocks. I’m open to hear any new tips you may have to for my situation.
Just hold on Sue, I’ve got a guy coming out this week who contracts with the city here to create all their parks with horse trails, drain peat bogs, etc. I’m going to pick his oh-so-experienced brain and see if he knows anything we don’t already know – or has some tips or tweaks that make a world of difference. I’ll report back!
Btw, nope, he doesn’t know anything that’s not already in this article. And yes, because horses hooves pound gravel and shift it around unevenly, eventually you will have spots where the geocloth is exposed – usually at the edges of an area.
The other important thing with gravel, is that it requires regular grading/maintenance. Scrape off the dirty layer (from dirt and small bits of manure) and re-surface/grade. Add more gravel from time to time. The frequency of adding more gravel depends on the activity level of your horses. The more frisky/active your horses are, the more they tear up the gravel. With an older or sedate herd, maybe you’d only have to top up once ever 2-3 years. With my crew, I need to add a layer of fresh 1/4″ minus every Fall.
Great info. Because this is the most informative article I’ve read I was curious what you would recommend under stall mats. The discussion seems to be wide ranging and I would appreciate your thoughts. I am considering granite stone dust or 89 Bahama at the moment which is a crushed coral product from its namesake.
Okay so when you say “stall mats” we’re talking about a completely enclosed area – 3 walls and a roof, right?
So you’re not looking at any wear from weather elements, just urine and hooves. In that case, I think it would depend on how your drainage is set up from your stalls… A barn with good drainage probably requires a different material under the mats, than a stall with poor/no drainage.
What are the environmental impacts of using a coral reef product? I know nothing about it, so I’m just asking you questions to stimulate your thoughts/research. Also can you find any forums or message boards where people have experimented with both?
Sorry I haven’t seen or experimented with stall footing. But let us know what you find out!
Yes three walls and an open stall doors to the outside. Our horses can come and go as the please into the paddock and back out into the property. Currently the stall area floor is stall pellets that are wood based mixed with shavings all from the local Tractor Supply. At the base it’s currently just packed dirt. The biggest issue is the immense amount of dust generated in the stalls. It’s just not healthy for the horses or us for that matter. So the plan is just to do stall mats in the 12×12 stall areas. My dilemma has been what product to put underneath. The Bahama product is a coral based limestone type rock it is not harvested as live coral it is basically rock mined like any other rock product and is then shipped and widely used for landscape purposes such as driveways and underneath pavers. It packs decently but also isn’t as sharp edged so it gets used in beach areas where there will be plenty of bare feet. I also have access to granite based “stone dust” and of course limestone and just about any other rock, sand or clay material. All of the rock based products are close to the same price being within 10 dollars a yard of each other. There are many opinions of course as to which is best, in fact it can be a bit overwhelming at times so I would appreciate any guidance. I totally understand that opinions are just that but yours is certainly very informed. Thanks for your time.
Ok so I’ve spent some time thinking about this, but I don’t think you’re gonna like my answer! I have put rubber mats down on every different gravel footing I’ve tested and they always move and become uneven. Because ALL ground sinks and displaces unevenly as weather and moisture changes. Especially as 1,000 lbs in concentrated disks punches down on it.
So the only surface I’ve seen work is concrete. And of course, to prep for concrete you have to do layers of gravel, then the concrete, but it would likely be less gravel/limestone than if you were putting mats right on top of the gravel.
The only other option I can think of, is to save your money on the material underneath and put that towards having custom-cut mats that fill the stall, wall-to-wall in one piece. So then when the ground shifts, it may develop sink spots, become wavy, etc but it doesn’t matter since your mats are one piece. Uneven ground doesn’t bother my horses at all. But trying to clean gaps in rubber mats that are shifting as the ground shifts, becomes a BIG hassle. Yes the mats may pull away from the edges/wall as the ground underneath becomes uneven, but I’m thinking that would be less hassle than multiple join-lines separating.
Course you could always do gravel this year – whatever packs down solid the best (in my region that’s barrier cloth, followed by 3″ rock, then 3/4″ minus gravel followed by 1/4″ crusher dust) – and see how it goes with the mats on top of that. If it doesn’t work well, then next year, pour concrete and your gravel base is already done. You may also be able to get away with just doing 3/4″ minus and then 1/4″ crusher dust if your subsoil (hardpan) is hard and not too deep.
Well, keep me posted if you can and let me know what happens!
Thanks for all the valuable info. We’re doing the paddocks now using your advice. Still deciding on what to put on the top. Thinking about limestone gravel or C30 sand. Right now we have geo textile underlaymen, 5” 1 1/4 gravel and 5” 5/8 gravel. However horses oversized the manure on the 5/8” gravel and real difficult to get it all off the gravel which should e an issue. Any advice?
Horses pulverize the manure on top of the gravel and very difficult to pick up the manure. Any advice?
GAH – this is the bane of my existence! And the only thing you can do to remedy it is to pour concrete on top of your gravel – that’s my ultimate plan, when I have my own place and enough $$ to do so. If you look at horse stables/properties all over the UK that is what they do.
Second thing that can really help – I was able to do this when I had 5 because there was enough space for everyone, but it no longer worked with 11:
https://listentoyourhorse.com/stud-piles-teaching-horses-where-you-want-them-to-poo/
Unfortunately, my landscaper/road builder/horse trail builder guy says that you need to scrape off the dirty layer of gravel at least once a year, and re-grade where needed. I have lost so much gravel from throwing it out with the manure, I highly suspect we’ll need to put down a load of crusher dust after scraping/grading this year.
Wish I had better news for you! BUT if you can teach them where to poo that could buy you 2-3 years before having to scrape/freshen. Let me know how it goes!
I’ve heard from a number of people who’ve tried both that limestone packs down better. I haven’t tried it myself.
I had my area done 2 years ago. Scraped out dirt, put in drain, geotextile, big rocks, then 57s, then screenings. Problem is, it doesn’t pack down the way I’d like. This year added more 57s, more screenings. Same issue of course. What can I use as a surface layer that will pack down fairly hard and not get cut up by hooves?
What are 57s Judy? I’ve not heard of that. The thing that packs down the hardest – especially if you water/soak it and use a 1000 lb compactor – is Crusher dust. Which is 1/4″ minus crushed gravel with the fines (rock dust). Make sure you don’t get smooth-edged crusher though – it needs to have the jagged/irregular edges to pack properly.
Having said all that, if you have an active herd like mine and you’ve got an area that’s sheltered from rain… they’re still going to move it around and carve it out over the winter. I wish I had better news for you. But I’m afraid the only thing that is maintenance-free is concrete!
Thank you so much for your extended read! So much good information (all based on experience with horses, which is good).
I haven’t read all of it yet, but for raking leaves that is very labour intensive I would suggest a leaf blower. Also handy in the shed to clean out all dust.
That is a good idea – however I have an intense dislike of the noise of leaf blowers! So I would rather rake and sweep. But thanks for sharing as I’m sure others on here may love the tip 🙂
king county (washington) considers gravel non permeable and wants you to get a grading permit to add any gravel.
be very careful
I asked a phd in geology who has worked a full career in geology. He was stunned by the county thinking gravel is non permeable and says they are dead wrong.
But that is the law.
I only bring this up because who would ever think that doing the right thing for your horses would be against the law.
Wow that’s crazy! Might be a case of “don’t ask… apologize later… if you have to” Some of those bylaws are aimed at developers though and they may not bother with small usage… it varies though, some are more rabid dog about it. I know another one of our readers in Washington had the county pay for her gravel! They have a program that subsidizes horse owners to improve drainage.
A really interesting topic, and I have a question: is gravel 4/3 & 4/1 good as an alternative to fine sand in horse rooms, or is fine sand better? I live in a dry, desert region in the Kingdom of Saudi Arabia and I have purebred Arabian horses
When you say “horse rooms” I’m assuming you mean stalls or stables? I think for small, enclosed spaces like that, sand and/or rubber mats would be better – because the horse needs to lie down on it. Especially Arabians, with their fine coats and sensitive skin, they’re not going to do well lying down on any kind of gravel. As long as you keep their hay off the sand (hay nets with a large bucket or built in container to catch escaped hay underneath?) it should be good. Post a picture of your horses – I’d love to see them!
Thank you for the clear answer , and it is my pleasure to present you an invitation to visit the Kingdom of Saudi Arabia to see the Arabian horses in their first homeland.
Beautiful! The two in front look taller than usual…
Thank you so much for the invitation, but I will have to wait until I can afford my own plane (or fractional jet ownership!) since there is no way I will ever have a covid vaccine 😉
This is an amazingly helpful article! I was all ready to order my gravel and tractor (my two new horses arrive at the end of April) until I read that you shouldn’t do this work when the soil is muddy. Should I let my horses have one season of muddy feet and wait till summer to do the work? Or should I risk making even more mud and do it now?
Thanks so much for your help!
Larry
Ah glad you found it Lawrence! I received your email, but no need to send the link now I see. If they’re coming end of April, you’re well over the worst of it. I would definitely wait until August and do it then. It doesn’t matter how much they churn it up now, by end of June you won’t notice a thing is amiss! It will all look normal. And that should be no problem for their hooves either – it’s such a short time. Congrats though and how exciting!
Thanks Jini! That’s a relief. Now I can focus on other things (water, feeders, trailer, star thistle, fences)! Your site is so inspiring and YOU are so generous!
You’re welcome 🙂 And how terribly EXCITING!! Let the adventure begin…
Btw, did a little research on star thistle as I hadn’t heard of it, and I think the important point here is how MUCH the horse would have to consume to be negatively affected:
“The exact chemical compound responsible for toxicity in Russian knapweed and yellow star-thistle has not been defined; however, a sesquiterpene lactone, repin, is believed to be the key neurotoxin present. The toxic effects of Russian knapweed and yellow star-thistle are cumulative, meaning that poisoning normally results when levels of the toxin build up in the body over time due to horses routinely grazing these plants.
Horses must consume relatively large quantities of the green or dried plants before the toxic threshold is reached. It has been suggested that a horse must consume 60% of its body weight in green Russian knapweed plant material before toxicity symptoms appear. For yellow star-thistle, toxicity symptoms may arise after horses have ingested 85 to 100% of their body weight in green plant material. Once these thresholds are reached, disease symptoms have a rapid onset.” Source: https://aces.nmsu.edu/pubs/_b/B710/
This is where we can choose to support our horses in a wholistic manner. If we have low-sugar hay in slowfeeders/haynets available 24/7 then our horses do not have to eat toxic plants to assauge the acid in their gut. They are then free to honor their body wisdom and *listen* to their body because they are not in physical or psychological scarcity.
My horses are surrounded by toxic plants – not one of them has ever become sick. They also know WHEN to eat a plant – some are not toxic at first growth in Spring and only become toxic as they approach maturity. Every one of my 11 horses knows this.
The other way to look at the ‘weed’ issue is from a soil ecology perspective. Ask yourself WHY your fields are hosting these plants? HOW are these plants, actually helping or addressing an imbalance in your soil? The solution is often not to remove them, but to heed their message and increase the health of your soil. A great book to give a whole other perspective on this is Wilding by Isabella Tree.
Thanks for the interesting discussion. My questions are as follows: if I use your advice of geotextile fabric with layers of gravel am I going to get washing of the fine gravel on the slopes with heavy rain? Can anyone comment on the use and longevity of products like “Lighthoof”? Perhaps in smaller, high traffic areas concrete is the cheapest long term solution!
Thanks for the discussion.
Paul
Hey Paul, if your fine gravel locks together (i.e. NOT smooth edges, with dust fines) then I haven’t seen any movement even in heavy, weeks-long rain. HOWEVER, now that we’re heading into 2022, I’ve had almost 3 years with the professional job that Mitchell did… and the geotextile cloth is coming through. Because the 4″ of gravel that was on top, has either been moved around by punchy horse hooves, or been thrown out along with manure that breaks down into tiny particle sizes. I am totally disillusioned with any gravelled solution now. Unless you are willing to have the top layer scraped off (and evened out again), and new crusher dust (1/4″ minus) laid down every year ($$) it’s just never going to work well in a rainy climate. If you can afford concrete I would 100% go with that!!
I really appreciated this article. I read it for research in preparation to write a blog post about a horse farm that uses 1/4″ minus for their horse arena and event venue. I write for a quarry and sand-and-gravel operation.
If I could add some thoughts based on my experience working in the sand-and-gravel business:
One thing I noticed is that the 1/4″ minus you initially used is a crushed drain rock rather than a quarried rock. Like you mentioned, it has blunted edges and won’t compact as well as a 1/4″ minus quarried rock. The crushed drain rock is going to roll more than the quarried rock. An easy way to tell the difference is that crushed drain rock is usually variegated (the grains will have multiple colors) while a quarried rock will mostly consist of the same color hue.
Like you mentioned, 1/4″ minus is dense and will definitely not drain as well as a coarser product. And it will drain even less well if it’s quarried rock rather than crushed drain rock. Gravel is bound to have runoff, so your installation of a French drain was a great idea.
For sure, a base layer of well-compacted, large, well-draining rock would have helped prevent the 1/4″ minus from being taken over by the mud so quickly. I would suggest a coarse, crushed quarry rock or crushed drain rock for a base rather than drain rock or pea gravel, especially for an area getting a lot of traffic. (See my notes about permeable aggregates below.)
In the section about using two layers of footing/drainage, Dr. Swinker mentioned using a coarse road base and a finer layer on top. This reminded me of the two-part base Washington Rock makes for turf sports field. The bottom layer is called a permeable aggregate base coarse and the top is a permeable aggregate top coarse. (Aggregate = rocks; permeable = allows water to pass through.)
The perm agg base coarse is basically a coarse 1-1/4″ minus, and the perm agg top coarse is a coarse 5/8″ minus (basically a 3/4″ minus). The two layers lock together and when compacted, created a smooth surface for turf to be laid on top of. So the layers act as a well-draining foundation.
You could possibly place a third layer of 1/4″ minus (what we call trail mix gravel) on top of the permeable layers. In muddy areas, perhaps you would even start with 2″-4″ quarry spalls (basically what you refer to as a 3″ clean rock; clean means “doesn’t have fines”).
Thanks again. I really appreciate the knowledge you shared.
Thanks so much Eve, for stopping by and adding your wisdom/experience to this conversation – much appreciated!
It’s a shame that gravel/aggregate companies around the globe can’t use the same, standardized terminology, that would make sharing information and understanding things a whole lot easier for those of us in the UK, Australia, Canada, USA etc!
So true! Even I get confused. I’m mulling the idea of doing a video/blog post just about gravel terminology and what it’s called in different areas. It wouldn’t be the most interesting thing I’ve ever written, but it might be useful.
You should definitely do that! And include the UK terminology because that’s even harder to figure out 🙂 Post a link here if/when you do!
It was great to read such an informative article. I am in the UK. We have been using cheap quarried chalk (local limestone) and compacting it on site. We have used it both inside the barn and outside. Our horses stay in the barn overnight in winter and are out during the day, and this is reversed in summer so the horses graze when its cooler at night. Over the last two years we have found that the compacted chalk works well under a straw bed inside. It is still porous so urine soaks through reducing the need for bedding removal. Outside is not so good; it gets slippery when wet and is even worse when it freezes so this year I have put some gravel/sand mix on top of the chalk in some areas and so far that is performing better.
Fantastic information Pippa – thanks so much for letting us know! I haven’t used chalk limestone at all. I heard the local racetrack likes to use it, but they are also grooming the track daily. It makes total sense though that it would be slippery when wet/freezing. And I would think you’d want to use sharper-edged gravel (not smooth) so it can bite into the limestone and hold… I discovered this by adding a load of smooth gravel on top of my crusher dust (1/4″ gravel) to see what would happen, and it just slid around and was useless.
Thank you for your response. The sand/gravel mix we have used is called Hoggin here and the best description I can find is on Wikipedia: https://en.wikipedia.org/wiki/Hoggin
Very interesting Pippa. It certainly looks ideal for walking paths, I’ll be interested to hear how it stands up to your horses’ hooves. Keep us posted!
Best article ever- I needed up making it a little simpler and doing geo textile then 6 in granite fines and have no mud in my barn yard-
But now I need to gravel the paths on my property- very occasional pick up truck traffic , mostly will be riding on these – Im thinking 1/2 in angular rock well compacted– 2 inches then 2 inches of granite fines on top of that?? What do you think?I will have gravel drains or hydro blow running across the roads to drain them- Really appreciate your help-
Well first of all, paths don’t need any less treatment than your barn yard if you want them to say mud-free. If 2 inches of 1/2 inch angular rock plus 2 inches granite fines (so 4 inches total) would work in your barn yard, then it will work on your paths. Of course you can always start with that and if it’s not enough, then add more on top.
The only other consideration is if you want to bring a heavy truck on the paths – in that case you definitely need to go with a layer of 3-inch minus road base, then whatever you want on top of that for your horses’ hooves.
Let us know how it goes!
I recently joined a horse track group and there was a post on fleece lasagna and how well it works in boggy areas , gateways and lane ways! Have you ever read about this? I guess it goes back for centuries in the European countries and the lady that wrote the list was from Scotland. She said most of the time you can find sheep herdsmen to give you the fleece for free. I am sure alpaca or lama might work too? Thought it was super great idea and she layered it with old hay/brush/sticks and other stuff (hence the lasagna reference) and said it had held up for two winters now! Of course here in our dry part of California I don’t really need it but thought it might really help some of you in the wetter climates? ✌🏼💚🐴
Well wool holds 40% it’s weight in water, so that makes sense. However, I can’t imagine anyone giving away fleece for free around here! It’s usually worth quite a bit of money.
Excellent article, and appreciate the ‘before and after’ pics. During the rainy season in the Western NC mountains, the mucky, suck your boots off, red clay is the bane of my existence. It permanently stains anything it comes in contact with (shoes, clothing, white horse feathers). I’ve always used crusher run—it’s pretty, soft (good for the horses to lie on and me to fall on), keeps their hooves impressively manicured, and easy to clean (kinda like scooping a giant litter box). Also goes a long way to keep down the fly/flea population. As you’ve shown, it doesn’t hold up well, but it’s not expensive to replenish here ($250 per 16k lbs.).
One word of caution: I’ve been using it for 6 years, no problems, but recently, recently, almost lost one of my horses to colic. Vet found him full of crusher run. I‘ve always fed both of my horses soaked hay cubes from feed tubs, along with free pasture access. We don’t know if it built up over years of ingesting a little at a time, or if he somehow swallowed a whole bunch at once. He’s recovering, but it’s been a slow, agonizing process. I don’t know if this will help anyone, beyond being aware of it, as I’m not sure myself how to prevent it. Currently, I’m adding bran and mineral oil into the hay cubes, and also doing the once a month ‘Sand Clear’ (for both horses, as a precautionary). Thanks again for the very informative article!
Thanks so much for sharing your experience. I think it also depends on the crusher – I got one load that was insanely dusty, I was concerned about them inhaling it. Luckily it rains so much here that the dust quickly disappeared, but in a drier climate it could certainly be a health hazard.
Another thought: Do you offer your horses free choice minerals? Like Hoffman’s? I wonder if he was eating the crusher seeking to address a mineral deficiency… You can just offer the plain (unflavored, no molasses) basic Hoffmans Minerals in a feeder/bucket in a covered area and let them help themselves. When the wildies came in they hoovered the minerals at an incredible rate for about 8 weeks and then normalized – they ate more in 8 weeks than the next 2 years! So they obviously had serious deficiencies (their hooves were pretty bad too and thin tails).
Use geotextile for enhanced filtration and erosion control when constructing the arena base. You can then layer it with geocell to prevent pooling and unstable ground. Using these products together will prevent freezing by allowing for proper drainage without needing a french drainage system.
Thanks for such an amazing article! I noticed in a couple of the comments you recommended concrete as the lowest-maintenence option – I’ve read that it’s not great for horses (donkeys, in my case) to stand on hard concrete for long periods of time – do you know anything about that? I’m tempted by the seeming “once and done” nature of it and also by the idea that it’d be easier to keep clean, but I don’t want to hurt their feet (which are already sensitive and very prone to thrush).
Yes, well the thing with concrete is people use it for walkways. If it’s inside a stall, or around a slowfeeder, where horses or donkeys will be standing for long periods, then they layer a softer material on top.
Most do 3/4″ thick rubber mats (these work great on top of any surface, including rocks) and if the horse is lying down, then they add straw or shavings as well.
I recently did a podcast with a woman in rainy Oregon who bought a bunch of the mud mats and she confirmed they work great. Good luck!